Spore slurry gets pitched online as a quick fix for bare concrete and sad planters, but most urban moss projects fail because people expect instant green. A moss spore slurry urban project can work, yet it only works when you treat it like propagation, not paint.
If you are trying to establish new patches on a wall, a rooftop planter, or a compacted tree pit, spores are the slow lane. The upside is that spores can cover awkward shapes and large areas that would be expensive to transplant.
This article is written for city conditions, meaning heat spikes, wind tunnels between buildings, and irrigation that is either too much or not enough. I will be blunt about what moss propagation can do, what it cannot do, and what the establishment timeline usually looks like.
When people say “slurry,” they often mean blended moss fragments, spores, or both, mixed into a spreadable liquid. The details matter because spores behave like seeds that need time, while fragments behave like tiny transplants that need contact and moisture.
Spore slurry vs. transplanting: pros and cons
Transplanting is the fastest way to get visible moss, and it usually wins when you need a green result for a public deadline. You move intact cushions or sheets, press them into place, and you can see coverage the same week.
A moss spore slurry urban project is cheaper per square foot, especially when the site is big and the target surface is irregular. You can reach corners, cracks, and textured blocks without cutting a hundred tiny patches.
The big downside of spores is time, because spores must germinate into protonema before you see anything that looks like moss. If your client expects a green wall in a month, spores alone will disappoint them.
Transplants fail in a different way, because they dry out and peel off if the surface is too smooth or the site is too hot. In cities, the first hot week can undo a careful install if you did not plan moisture access.

I often prefer a hybrid approach, meaning a thin slurry for coverage plus a few small transplants as “anchors” in the wettest micro spots. That setup gives you something to monitor early while the slower spore side works in the background.
Picking source material ethically and responsibly
Ethical sourcing starts with a simple rule, never strip moss from parks, natural areas, or protected sites. Urban moss patches look common, but many are slow growing and get wiped out by one careless harvest.
Use material from your own property, from consenting private owners, or from licensed growers when you can. If you must collect, take pinches from many spots rather than scooping one patch into a bucket.
Choose local species that already handle your city’s summer heat and winter freeze cycles. A moss that thrives on a shaded creek rock may die fast on a sun baked masonry wall.
Look for sporophytes if your goal is a true spore slurry, because capsules are where the spores come from. Mature capsules are usually brownish and dry looking, and green capsules are often not ready.
Keep your collection clean, because soil seeds and algae hitchhike easily and can outcompete moss during establishment timeline bottlenecks. I shake off loose soil, remove obvious weeds, and store material cool and slightly damp until mixing day.
Preparing surfaces: roughness, cleanliness, and moisture access
Surface preparation decides most outcomes, because moss needs texture to grab and a film of water to stay alive between mistings. Smooth sealed concrete and glossy paint are basically anti moss coatings, so do not expect miracles.
Clean off dust, salts, and oily residue, because a slurry dries into a crust that can lift off like dried mud. I use a stiff nylon brush and plain water first, then spot clean with diluted vinegar only when mineral deposits are obvious.
| Surface type | Prep that usually works | Moisture strategy |
|---|---|---|
| Unsealed concrete or mortar | Brush hard, rinse, roughen with masonry rub stone if smooth | Drip line above or frequent misting in first month |
| Brick (older, porous) | Brush joints, remove loose grit, avoid sealing products | Target mortar lines, they hold water longer |
| Glazed tile or painted wall | Do not slurry directly, add mesh or rough backing first | Keep backing damp, expect slower attachment |
| Planter soil surface | Remove mulch chunks, tamp lightly, add fine grit topdressing | Light irrigation, avoid splash and puddles |
| Stone (granite vs. sandstone) | Sandstone needs light brushing, granite may need roughening | Use shade and mist, granite dries fast |
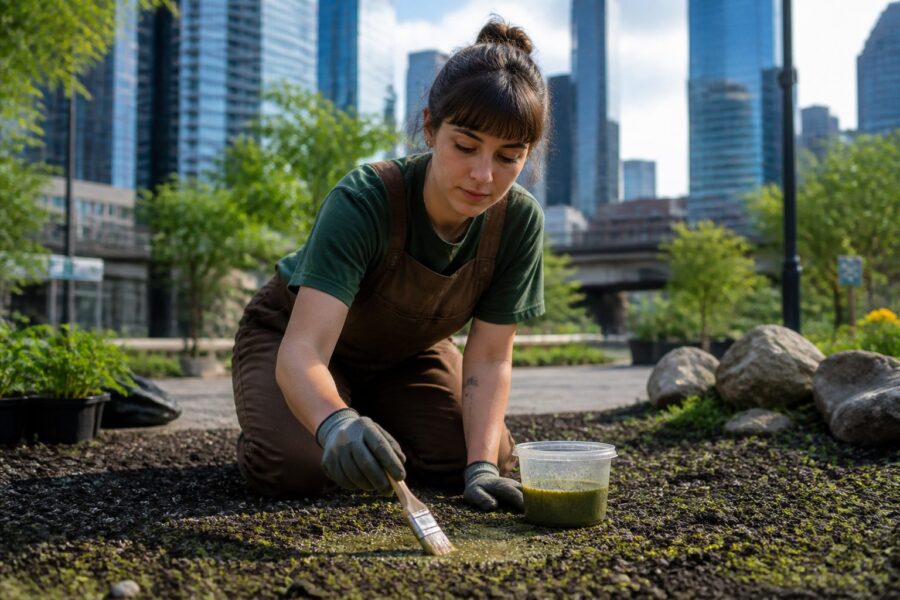
Mixing a slurry that spreads evenly
A good slurry is thin enough to brush or spray, but thick enough that particles do not all sink to the bottom in one minute. If it separates fast, you will apply mostly water at the end and mostly solids at the start.
For spore focused mixes, I rely on capsule material plus a tiny amount of finely chopped moss to help hold moisture on the surface. Pure spores in plain water can work, but it often dries too cleanly and blows away.
Skip the internet habit of adding dairy, because it smells, it attracts pests, and it can grow bacteria in warm weather. If you want a binder, use a small amount of clay, very fine compost, or a cellulose based tackifier meant for erosion control.
Use dechlorinated water if your tap water is heavily treated, because some municipal water is harsh on delicate protonema. I let water sit overnight in an open bucket, or I use collected rainwater when it is clean.
Mix in a bucket with a paint stirrer or a dedicated blender you will never use for food again. Blend lightly, because you want a suspension, not a smoothie that turns moss fragments into mush.
Application techniques for walls, planters, and soil
On walls, I prefer brushing rather than spraying, because spray drift wastes material and creates a mess on sidewalks. A cheap masonry brush lets you press the slurry into pores and small cracks.
For vertical work, apply in thin coats and come back for a second pass after the first layer gets tacky. Thick layers slump, crack, and peel, especially when the wall heats up in afternoon sun.
In planters, protect the slurry from splash by topdressing with a light grit layer after application. Fine granite grit or crushed pumice works well, and it also helps with surface preparation by keeping the top moist longer.
On soil, avoid rich potting mixes that grow algae and liverworts faster than moss. A lean, gritty surface with low nitrogen makes moss propagation easier because it reduces competition.
If you have irrigation, aim for gentle drip or mist rather than overhead spray that blasts the slurry away. I have watched a perfect coat disappear in one heavy watering cycle, and it is a painful way to learn.
The first month: keeping moisture steady without wash-off
The first month is where most moss spore slurry urban project attempts collapse, because the surface alternates between bone dry and flooded. Spores and protonema need steady moisture films, not dramatic swings.
You can keep moisture steady with frequent light misting, capillary wicks, or a drip line set very low. Avoid soaking, because puddles invite algae mats that smother young moss.
- Mist early morning, not midday heat
- Use a fine nozzle, not a jet spray
- Add a temporary shade cloth on hot walls
- Pin jute netting for vertical wash protection
- Keep foot traffic and pets away from fresh coats
- Check edges first, they dry fastest
Light and shade targets during establishment
Most urban moss does best in bright shade, meaning enough light to photosynthesize but not enough sun to cook the surface. East facing walls and the north side of planters are usually easier than south facing brick.
Direct sun can work if the surface stays damp, but that is rare in cities where wind and heat strip moisture quickly. If you insist on a sunny site, pick a spot with morning sun and afternoon shade, then plan irrigation like you mean it.
Deep shade is not automatically good, because moss still needs light and air movement. Under dense shrubs, you can get slime algae and moldy biofilms that outgrow slow protonema.
Watch the microclimate, not the compass, because a reflective window can double heat and light on a small section of wall. I have seen moss hold on one side of a downspout and fail six inches away due to reflected glare.
If you can measure, aim for moderate light levels similar to what you would give a shade house plant near a window. If you cannot measure, track how quickly the surface dries after misting, because that is the practical signal that matters.
What growth looks like week by week (realistic expectations)
Week one usually looks like nothing, and that is normal for spores. You may see the slurry darken when wet and fade when dry, which fools people into thinking growth is happening.
Week two can bring a faint green haze if conditions stay moist, especially in protected cracks and mortar joints. This stage is protonema, and it looks more like algae fuzz than moss cushions.
Week three is where patience matters, because the haze may stall if you miss a few hot days. When people quit here, it is often because they expected moss leaves, not a thin film.
Week four may show tiny leafy shoots in the wettest micro spots, but coverage is still patchy. If you used some chopped fragments, those pieces may green up sooner and give you a morale boost.
Past the first month, the establishment timeline depends on season more than effort, and winter installs often sit quiet until spring. For many sites, you are looking at three to six months for obvious patches, and a year for a filled in look.
Preventing failure: birds, drying winds, and heavy rain
Birds love fresh slurry because it looks like mud with snacks, and they will peck at it for grit or nesting material. If you see repeated disturbance, add a temporary mesh, or move the project to a less exposed corner.
Drying winds are worse than sun in many urban corridors, because they erase surface moisture in minutes. Wind breaks can be as simple as a temporary screen, a planter placed as a baffle, or choosing the leeward side of a wall.
Heavy rain can wash off new coats, especially on vertical surfaces and hard packed soil. Jute netting, coir fiber mats, or a thin erosion control blanket can hold the mix in place without sealing the surface.
Watch for salt, because winter deicing spray kills moss fast and leaves white crusts that block attachment. If the site is near a road, pick a protected zone or accept that you will be reapplying every season.
Competition is a quiet failure mode, because algae and cyanobacteria love the same moisture you provide for moss propagation. If you see slick green sheets, reduce nutrients, reduce soaking, and increase drying cycles slightly without letting the surface fully desiccate.
Transitioning to low-maintenance care after establishment
Once you have real leafy shoots and they survive a few dry downs, you can start backing off misting. The goal is to train the patch to your site’s normal moisture pattern, not to keep it in a greenhouse forever.
Switch from daily misting to a schedule tied to weather, like after three dry days or during heat advisories. If you keep everything constantly wet, you will keep feeding algae and you will never get a tough patch.
Do not fertilize, because moss does not want rich feeding the way vascular plants do. If you need greener color, focus on shade management and consistent moisture access instead of nutrients.
Light cleaning helps, because dust and soot can seal the surface and slow growth over time. I rinse gently with a fine spray, and I avoid scrubbing once the moss is attached.
If you get bare spots, touch them up with a small batch rather than recoating everything. A targeted repair keeps your established areas intact and respects the slow, steady establishment timeline that moss prefers.
Conclusion
A moss spore slurry urban project is realistic when you treat it like careful horticulture, with surface preparation and moisture control doing most of the work. If you want fast green, transplant, and if you want coverage on tough shapes, use slurry and accept the wait.
The main mistake is chasing hacks while skipping basics, especially roughness, cleanliness, and a plan for steady moisture. When you respect those constraints, moss propagation becomes predictable enough for real urban installs.
Plan your expectations around weeks of quiet and months of gradual change, because that is how spores behave. If that timeline fits your site and your patience, you can establish new patches that last.


