Urban moss projects look slow at first, then they suddenly look alive once the plants stop acting like loose green confetti. This moss establishment timeline urban guide covers what I expect in the first 12 weeks on walls, pavers, roofs, and concrete planters.
If you are used to seed germination charts, moss will mess with your patience because it does not “sprout” in a neat, obvious way. You have to read moss acclimation through texture, grip, and how quickly it rehydrates after drying.
I also think most timeline failures come from two boring causes, surfaces that stay too dry, or surfaces that stay too wet and slimy. Once you watch those two problems, the coverage rate becomes easier to predict and early growth signs stop being mysterious.
What “established” means for moss in urban builds
“Established” does not mean the patch looks thick and photo ready, it means the moss can handle normal swings in moisture without peeling off. On urban surfaces, establishment is mostly about attachment, not height.
For sheet moss or collected fragments, established means the underside has made contact with the micro pits of the surface and stopped sliding when you mist it. For slurry applications, established means the film has turned into anchored specks that do not rinse away in the next rain.
In week terms, I call a project “functionally established” when you can skip one watering without seeing the whole area go crispy and lift at the corners. That usually happens before you get impressive coverage rate numbers, which is why photos can be misleading.
Early growth signs are subtle, like a darker green after rewetting, or a patch that dries more slowly than the bare concrete next to it. If you only look for new “leaves,” you will miss the real signal, which is that the patch is staying put.
On brick, established also means the moss is using mortar pores and tiny ledges as anchors, so it survives wind and splash. On smooth sealed stone, “established” can be a smaller goal, and you may need a roughened strip to make it realistic.
Week 1–2: stabilization and avoiding early setbacks
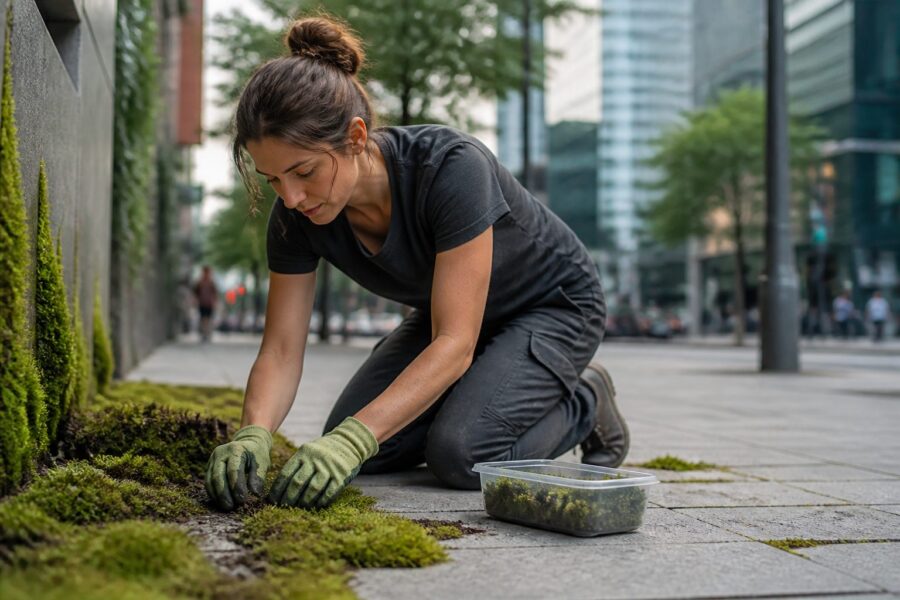
The first two weeks are about keeping the material in place long enough for it to stop behaving like debris. If you lose moss in this window, it is usually from runoff, pressure from spray, or a surface that was dusty or oily.
Mist gently and close to the surface, because a hard spray can float fragments away even if you think you are being careful. I like a pump sprayer set to a fine mist, and I keep the nozzle angled so water lands and sinks instead of bouncing.
Watch for the “wet tissue paper” phase where moss looks darker but also looks flattened and fragile. That is normal moss acclimation, and the mistake is rubbing, brushing, or “checking adhesion” with your fingers.
In this window, the right watering frequency depends more on wind and sun than on temperature. A cool breezy day can dry a vertical wall faster than a warm still day, and your moss establishment timeline urban plan should follow that reality.
If you see green smears running down the surface, you are overwatering or spraying too hard, and you are literally washing away your future coverage rate. Back off, let the surface tack up, and restart with lighter misting and shorter sessions.
Week 3–4: moisture patterns and first reliable hold
By weeks three and four, you should start noticing that some zones stay damp longer than others, and those zones become your “core” patches. This is where moss acclimation shifts from survival to actual attachment behavior.
Do not chase perfect uniform wetness, because urban surfaces always have microclimates caused by shade lines, runoff paths, and heat stored in masonry. Instead, use the pattern as feedback, and expand from the spots that already act like moss wants to live there.
| Surface cue | What it usually means | What to do this week |
|---|---|---|
| Moss stays dark green 2 to 4 hours after misting | Moisture retention is adequate and adhesion is starting | Keep the same schedule and avoid strong spray |
| Patch turns pale within 30 to 60 minutes | Too much sun, wind, or a slick surface | Add shade cloth or roughen a small strip for a test |
| Edges curl up after drying | Dry down is too fast or the edge has poor contact | Press edges gently when damp and reduce drying speed |
| Green film looks slimy and smells musty | Too wet, low airflow, algae is competing | Skip a watering, increase airflow, reduce nutrient input |
| Specks remain after a light rain | First reliable hold is forming | Start measuring small coverage changes by photo grid |
Week 5–6: coverage changes you can actually measure
Weeks five and six are when I start trusting my eyes again, because the patch stops “resetting” after every dry spell. If you take weekly photos from the same spot, you can finally track coverage rate without guessing.
Use a simple grid method, like a printed 10 by 10 square overlay on your phone screen, and estimate how many squares contain moss. The number will still wobble with wet versus dry color, so compare photos taken at the same moisture state, ideally one hour after misting.
Early growth signs at this stage include tiny new tips at the margins and a more “velvety” texture instead of a shredded look. On rough concrete, you may see moss filling pits first, which can look like nothing until the pits connect.
If you used fragments, you may notice the original pieces look less distinct because new tissue bridges between them. That bridging is the real win, and it is a better marker of moss establishment timeline urban progress than height.
Keep your watering steady and boring, because big swings slow things down more than a slightly imperfect schedule. If you want to push growth, do it with longer humid periods, not with drenching that causes runoff.
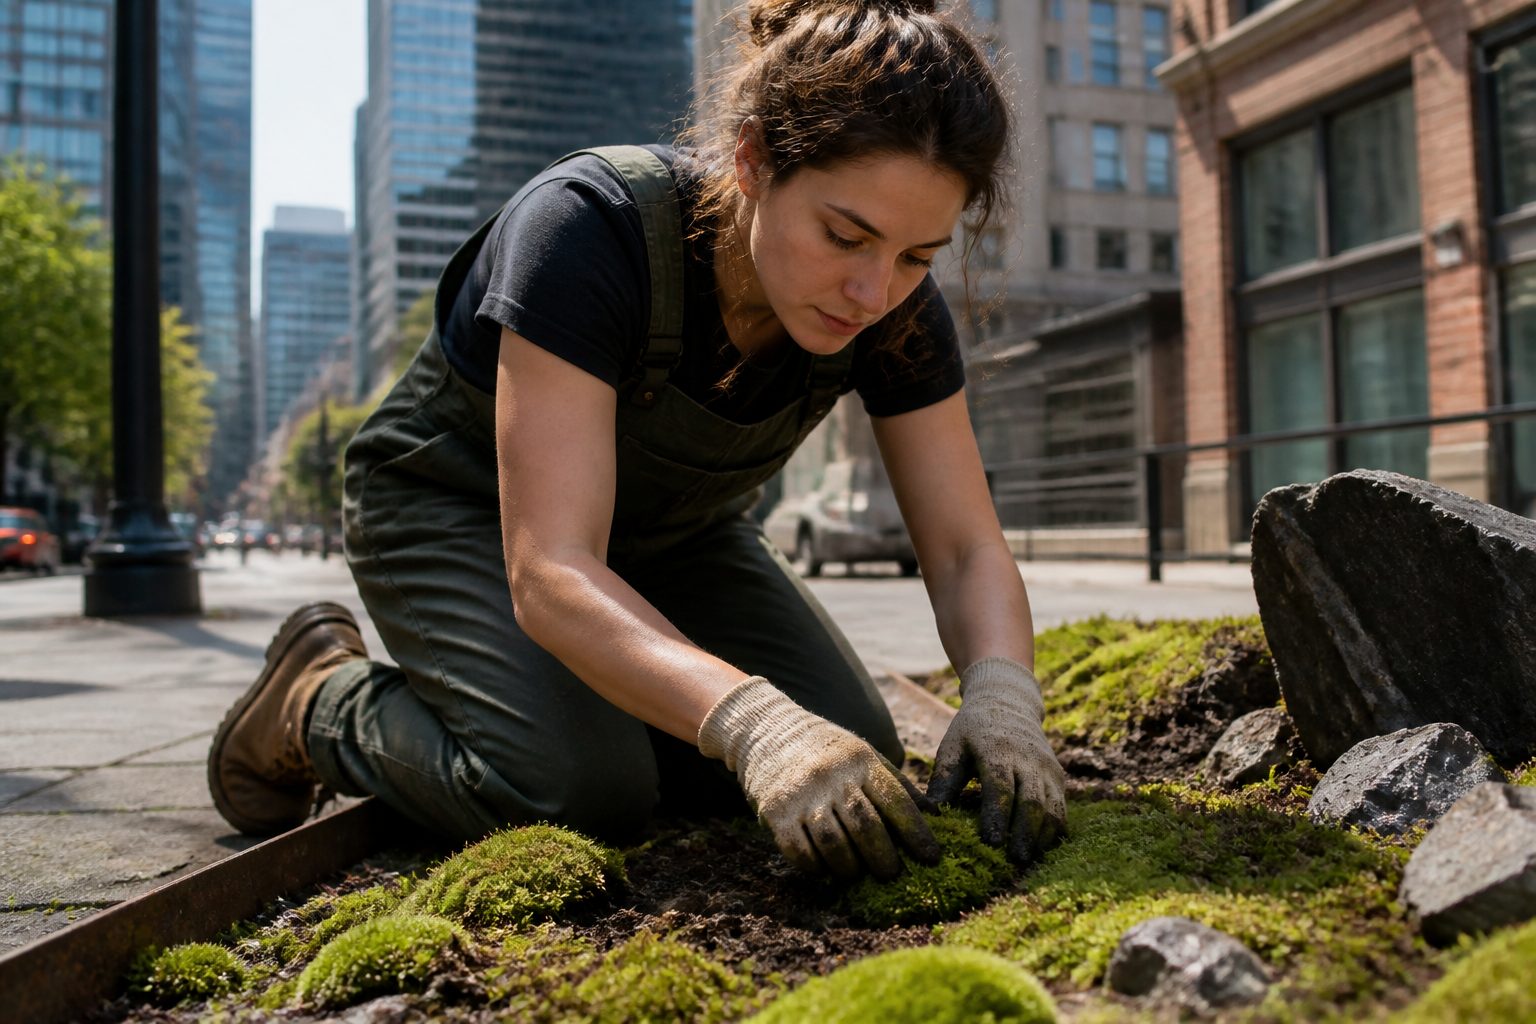
Week 7–8: managing edges, gaps, and patchiness
By weeks seven and eight, most projects show patchiness, and that is not a personal failure, it is physics. Edges dry faster, corners catch wind, and high points shed water, so your coverage rate will look uneven.
The fix is targeted work, not more water everywhere. I re-press loose edges when they are damp, and I add small “staple” fragments into stubborn gaps instead of smearing slurry across the whole area again.
If a gap stays bare, ask why, because the surface there is telling you something. It might be a hot spot from reflected sun, a drip line that scours tissue, or a smooth patch of sealant that blocks attachment.
When you patch, match species and texture if you can, because mixed mosses often dry at different speeds and create weird edge tension. This is also where moss acclimation matters, since newly added pieces will lag behind your established core.
Do not chase a perfect rectangle of moss, because urban moss looks better when it follows the surface’s natural wet map. I would rather have a stable 60 percent coverage rate than a fragile 90 percent that peels after the next heat spike.
Week 9–10: tuning light and watering based on performance
Weeks nine and ten are when you earn time back, because you can tune care based on performance instead of fear. If your moss rehydrates quickly and stays attached through a normal dry day, you can begin spacing waterings.
Light is the lever most people ignore, and it matters more than they want to admit. If a wall gets harsh midday sun, a small shade cloth strip or a taller planter nearby can change your moss establishment timeline urban outcome fast.
Watering should shift from frequent mist to fewer, longer humid periods, especially on vertical surfaces. I prefer early morning misting that gives a slow dry down, because night watering can keep things wet and push algae.
Use your own early growth signs as the metric, not generic schedules. If edges curl every afternoon, you need slower drying, and if surfaces stay glossy for hours, you need more airflow and fewer watering events.
At this stage, a stable coverage rate might stall for a week, and that can still be progress. Moss often puts energy into grip and dense tissue before it expands again, especially after a change in light.
Week 11–12: signs your system is resilient (or not yet)
By weeks eleven and twelve, you should be able to do small stress tests without losing the project. Skip one planned misting, then watch how quickly the patch recovers after the next watering.
Resilient moss darkens and plumps within minutes of wetting, and it does not slide or smear when water hits it. Weakly attached moss looks like it “floats” on the surface, and the edges lift as a single sheet.
Another good sign is that the patch holds through a moderate rain without streaking. Rain is different from mist, and it exposes bad adhesion and bad runoff paths in a way your sprayer never will.
If your coverage rate has climbed but the patch still peels, you have a surface problem, not a growth problem. Roughen a test area, remove sealers, or switch to a more suitable substrate like a mortar skim coat in the worst zones.
Moss acclimation also shows up here, because the patch should handle the normal urban cycle of damp nights and dry afternoons. If it only looks good right after misting, it is still in the dependent phase.
How weather swings change the timeline
Weather swings can stretch or compress every stage of the moss establishment timeline urban plan. A single week of hot wind can undo the visible gains of a month, even if the moss is still alive.
Heat waves speed drying, and the big risk is edge lift and brittle tissue that loses contact. During extreme heat, I aim for shade and humidity first, then I water lightly to avoid turning the surface into a runoff chute.
Cold snaps are less dramatic, but they slow the coverage rate because the moss spends more time dormant. If nights drop near freezing, avoid evening watering that leaves water sitting on the surface for hours.
Heavy rain can help if the moss is already attached, because it gives long wet periods without your sprayer’s impact. Heavy rain can also strip slurry projects that never got a grip, so I avoid starting new slurry right before storm season.
Air pollution and dust matter more than people think in cities, because a dusty film blocks contact and changes surface wetting. After a construction week nearby, I sometimes rinse the area gently, then resume normal misting once the surface is clean.
A simple tracking sheet: what to record each week
If you want a timeline that you can actually improve, track a few boring numbers and one or two honest observations. The goal is to connect moss acclimation and early growth signs to what you changed that week.
Keep the sheet short enough that you will use it, because a perfect spreadsheet you abandon is useless. I track once a week on the same day, and I take photos from the same distance with the same framing.
- Percent coverage estimate from a 10 by 10 photo grid
- Watering events per week, with time of day
- Longest dry period in days
- Sun exposure note, such as “full sun after 1 pm”
- Edge condition, such as “flat,” “slight curl,” or “lifting”
- Color after rewetting, such as “dark in 5 minutes”
- Runoff or streaking after rain
Common reasons timelines fail and practical fixes
Most failures look like “the moss did nothing,” but the cause is usually simple and repeatable. The top issue is a surface that never stays evenly damp long enough for attachment to develop.
If the surface dries in under an hour every day, add shade, reduce wind, or change the substrate rather than doubling watering. A thin mortar skim coat on concrete, or a roughened strip on stone, often fixes the adhesion problem faster than any moss “recipe.”
The second issue is chronic wetness, where the surface stays glossy and the moss turns slimy or gets buried by algae. Cut watering frequency, increase airflow, and stop adding nutrients, because fertilizer is an algae invitation in urban builds.
Another timeline killer is starting with moss that was already stressed, sun baked, or stored dry for too long. If your starting material smells off or crumbles to dust, your moss establishment timeline urban expectations should reset, because you are rebuilding from scraps.
Finally, people accidentally sabotage adhesion with “maintenance,” like scrubbing soot off the wall or pressure washing nearby. Put a simple boundary around the project area, and treat it like fresh paint until week twelve.
Conclusion
The first 12 weeks are mostly about getting moss to stick, then letting it expand at its own pace. If you focus on moisture patterns, gentle watering, and honest tracking, your coverage rate will rise without drama.
Use early growth signs like fast rehydration, stable edges, and less streaking after rain as your real milestones. When those markers show up, moss acclimation is working, and the rest of the timeline becomes easier to manage.


