
Urban moss looks like soft green decoration, but it also holds carbon in a way you can actually track. The trick is to measure what you can at home and stay honest about what the numbers mean.
If you are curious about urban moss carbon storage, you do not need a lab, a gas analyzer, or a grant. You need a consistent patch, a few simple tools, and the patience to record boring details.
This article sticks to measurement you can do on a balcony, roof, or windowsill without wrecking your moss. It focuses on biomass estimate approaches, carbon cycle basics, and moss growth rate tracking that hold up under everyday conditions.
Carbon storage vs. carbon capture: clear definitions
Carbon capture is the act of pulling carbon dioxide out of the air through photosynthesis. Carbon storage is what happens when that carbon ends up locked in plant tissue or in organic matter for a meaningful amount of time.
In moss projects, capture happens when the moss is hydrated and lit, because dry moss mostly pauses metabolism. Storage depends on how much biomass you build and how long it stays put instead of decomposing or washing away.
A lot of online claims blur these terms, then jump straight to climate math that sounds bigger than it is. If you want to talk about urban moss carbon storage like an adult, keep capture and storage separate in your notes.
Carbon cycle basics matter here because carbon moves fast in small systems. Your moss captures carbon, then some returns to the air through respiration, decomposition, and microbial activity in the substrate.
At home, you usually cannot measure CO2 flux directly, so you measure stored carbon indirectly through growth. That is still useful, as long as you label it clearly as a biomass estimate that you convert to carbon with assumptions.
What parts of a moss system store carbon
Most of the carbon you can reasonably claim lives in the moss tissue itself, meaning stems, leaves, and the brown thatch underneath. Moss has no true roots, but the older material at the base can hang around and act like a thin organic layer.
Some carbon ends up in the substrate, especially if you use coco coir, compost, or bark-based mixes. If you mount moss on inert stone, brick, or ceramic, the substrate storage is close to zero and your numbers mostly track plant mass.
Biofilms and microbes store carbon too, but that is hard to separate at home. I treat that as background noise unless I am comparing two substrates side by side and keeping everything else identical.
Dead moss is still carbon storage until it decomposes or blows away. In a windy urban spot, physical loss can beat biological decay, so anchoring and moisture control affect storage just as much as growth does.
If your project includes leaf litter, twigs, or dust trapped in the moss mat, that material adds carbon but it also adds confusion. For clean urban moss carbon storage tracking, I prefer a defined area with minimal debris and a quick brush-off before photos.
Setting realistic expectations for urban moss projects
Moss is great at surviving neglect, but it is not a fast carbon pump in most city setups. If your goal is personal carbon accounting, you will learn more from the measurement habit than from the final grams of carbon.
The honest win is that moss lets you see carbon cycle basics in miniature, with growth spurts after rain and stalls during dry spells. That pattern teaches you what capture depends on, and it keeps you from assuming a steady moss growth rate all year.
| Project type | What you can realistically measure | Common expectation trap |
|---|---|---|
| Windowsill tray (10 x 20 inches) | Percent cover and thickness change | Assuming indoor light equals outdoor growth |
| Balcony moss wall panel (1 to 2 square feet) | Photo-based area gain and color shifts | Counting brown drying as permanent loss |
| Roof corner patch on pavers | Seasonal persistence and rehydration response | Ignoring wind scouring and foot traffic |
| Sidewalk crack colony (observational) | Presence, dormancy cycles, and expansion edges | Calling it storage without defining boundaries |
Estimating moss biomass with simple, non-destructive methods
You can get a workable biomass estimate without harvesting if you combine area, average thickness, and a density assumption. The point is not perfection, it is repeatability across months.
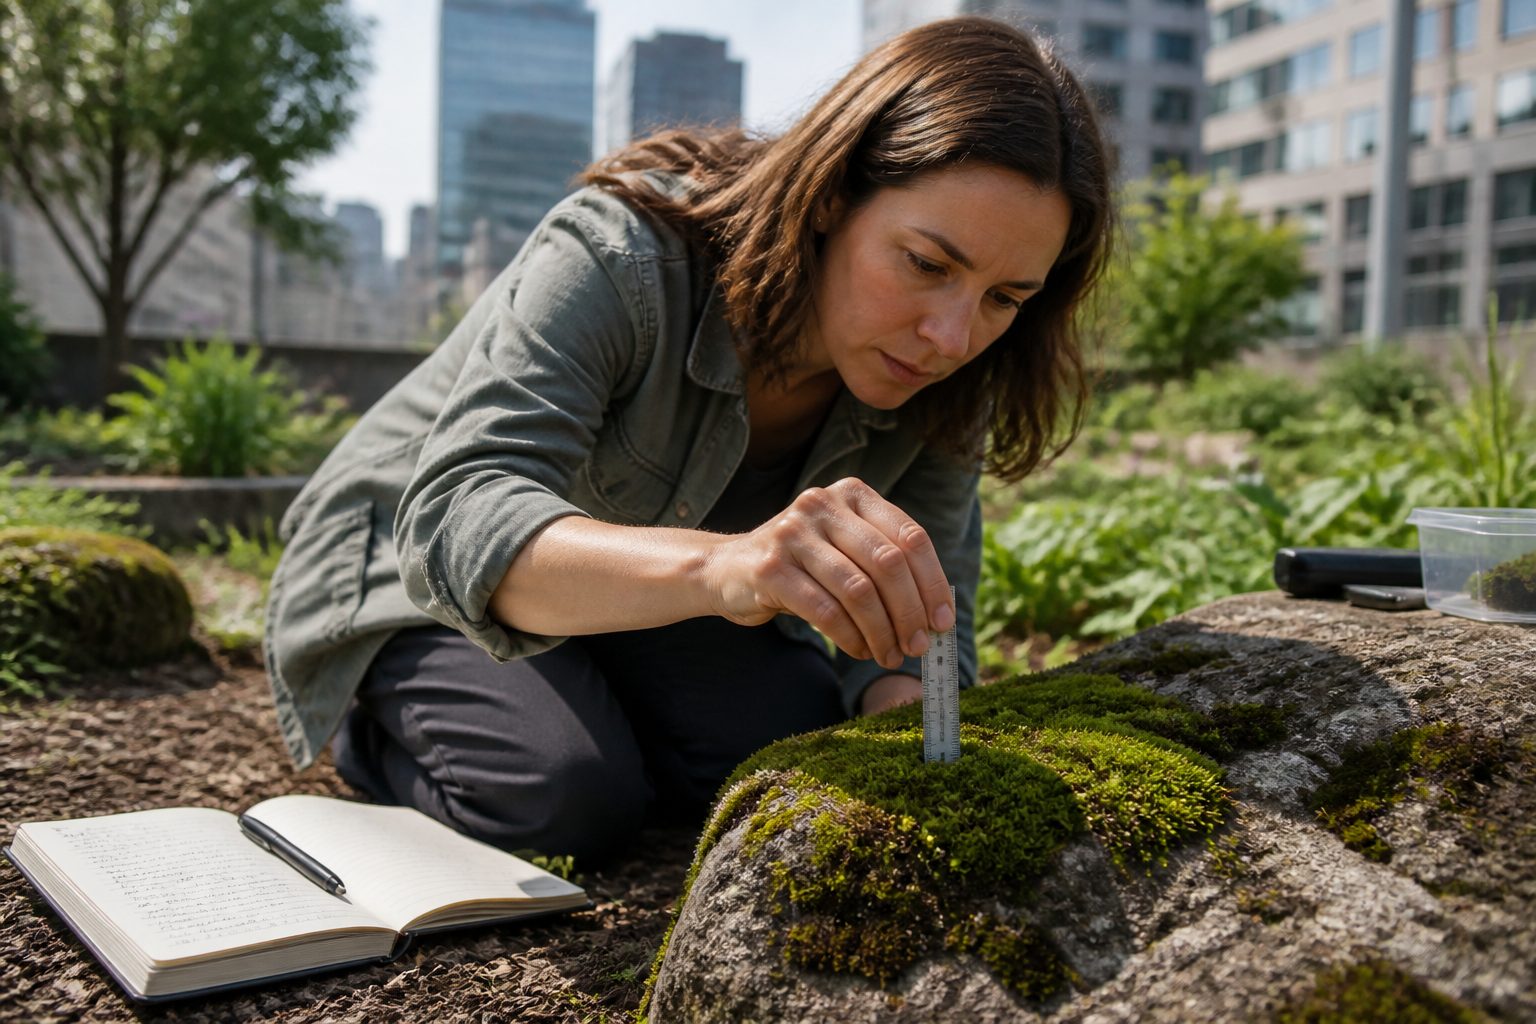
Start by defining a fixed measurement plot, like a 10 cm by 10 cm square on a tray or panel. Mark corners with paint pen dots on the frame, not on the moss, so your plot does not drift.
Measure thickness with a toothpick and a ruler, pushing gently until you hit the hard base and noting the depth. Take five readings per plot, then use the median, because one fluffy tuft can throw off your average.
For density, you need one calibration sample at the beginning, and you can keep it small. Harvest a 2 cm by 2 cm plug from outside your main plot, dry it thoroughly in a warm, ventilated spot, weigh it on a cheap kitchen scale, and treat that dry mass per area as your baseline.
Once you have dry mass per square centimeter for your moss species and cultivation style, you can scale it to your plot area and adjust with thickness changes. This method is blunt, but it keeps your urban moss carbon storage math tied to something you actually measured.
Tracking growth over time with photos and grids
Photos beat memory, because moss changes slowly and your brain fills in gaps. If you want moss growth rate data you can trust, you need the same angle, the same distance, and the same lighting setup each time.
Print a simple grid on paper, tape it behind a clear tray, or place a removable grid frame around your patch. A 1 cm grid makes percent cover calculations easy, even if your moss grows in messy islands.
Use your phone camera, lock focus and exposure if your app allows it, and take the shot at the same time of day. Cloudy daylight is better than mixed indoor bulbs, because it keeps color shifts from looking like growth.
When you review images, count filled grid squares or use a simple overlay in free software like GIMP. You do not need fancy segmentation, you just need a consistent rule for what counts as live cover versus bare substrate.
Growth rate can be expressed as percent cover gained per week, or as edge advance in millimeters if you have a clear front line. I like both, because cover tracks colonization while edge advance shows whether the mat is actually expanding or just thickening.
Moisture and light: the two biggest growth levers
Moss does most of its work when it is wet, and it does not care how motivated you are when it is dry. If your patch dries for days at a time, your urban moss carbon storage number will stall even if the moss looks fine.
In cities, wind is often the hidden moisture thief, especially on balconies and rooftops. A simple windbreak, like a slatted screen or a clear plastic side panel with ventilation gaps, can change your moss growth rate more than fertilizer ever will.
Light is the other lever, and most indoor moss setups are dimmer than people admit. A bright north window can work for some species, but many urban projects do better with outdoor shade or a small grow light on a timer.
Pay attention to heat, because hot surfaces cook thin moss mats even when you mist them. Dark metal planters and black membranes can hit temperatures that turn green tips to tan in an afternoon.
If you change moisture or light mid-experiment, write it down and treat it like a new phase. Otherwise your biomass estimate curve turns into a story you cannot explain, and you will blame the moss instead of your setup.
Substrate choices and their carbon tradeoffs
Substrate choice matters because it affects both growth and what you count as stored carbon. Some substrates add organic carbon up front, which can make your project look better on paper while also decomposing faster.
Stone, brick, and concrete are mostly inert, so they keep the accounting simple. The downside is that establishment can be slower, and your moss may need more frequent misting until it builds a thicker mat.
Coco coir holds water well and helps moss spread, but it is imported and processed, so it carries its own footprint. If you use it, treat it as a growth aid, not as free carbon storage credit.
Wood-based substrates like bark and untreated timber can feed fungi and bacteria, which can speed decomposition. That does not make them bad, it just means your carbon cycle basics include faster turnover and less long-term storage.
My favorite compromise for small urban trials is a thin mineral base with a rough texture, like porous ceramic tile or pumice-rich mortar. It anchors moss, buffers moisture, and keeps your biomass estimate focused on the moss itself.
Keeping your data consistent: notes, dates, and conditions
Consistency is the whole game, because your measurements are simple and your signal is small. A sloppy notebook can erase months of careful cultivation.
Pick a measurement day, like every Sunday morning, and stick to it. If you miss a week, record that gap instead of backfilling with guesses.
- Date and time of measurement
- Location and plot ID
- Watering or misting frequency since last check
- Weather notes, especially heat waves and heavy rain
- Light notes, including shade changes and indoor lamp settings
- Photo filename or album link
- Any disturbances, like pets, wind damage, or cleaning
Interpreting your results without overstating impact
Once you have a biomass estimate trend, you will be tempted to convert it into big climate claims. Resist that urge, because your project is real, but the scale is small.
A common shortcut is to assume dry biomass is about 45 to 50 percent carbon, then multiply by 3.67 to express it as CO2 equivalent. That conversion is fine for personal tracking, but it is still an estimate stacked on top of an estimate.
Urban moss carbon storage is also reversible, because drought, vandalism, or a bad week of heat can kill a mat fast. When moss dies, stored carbon does not vanish instantly, but it also does not stay locked up forever.
Watch for plateaus that come from space limits rather than poor care. A tray that hits full cover may keep thickening slowly, so your photo grid looks flat while thickness readings still creep upward.
If you want to be extra honest, report both gross gain and net gain after losses. A season where you grew 20 percent cover and lost 15 percent to wind still taught you something important about persistence.
How to improve storage potential through better cultivation
If your goal is more storage, the first move is to keep moss alive through the harsh weeks, not to chase maximum greenness on perfect days. Long-lived mats beat boom-and-bust growth every time.
Build a microclimate that stays humid longer, using shade cloth, wind screens, and surfaces that do not overheat. Even a shallow rim around a tray can cut evaporation and stabilize moss growth rate.
Choose species that match your site, because forcing a forest moss onto a sunny balcony usually ends in crispy tips. If you do not know the species, treat your local sidewalk moss as your best starting candidate and propagate from there.
Feed lightly, if at all, because many mosses respond poorly to rich nutrients and algae can take over. If you experiment with dilute fertilizer, do it on a separate test patch so you do not wreck your main urban moss carbon storage plot.
Increase surface roughness and anchoring, since physical loss is a real carbon leak in cities. A thin mesh, a textured mineral coating, or a shallow crevice can keep new growth from sliding off during heavy rain.
Conclusion
You can measure urban moss carbon storage at home by tracking area, thickness, and a simple calibration for dry mass. The numbers will be approximate, but the method can be consistent and useful.
The best takeaway is not a heroic CO2 claim, it is a clear record of what made your moss grow or stall. When you treat your setup like a small experiment, carbon cycle basics stop being abstract and start looking like weekly photos and notes.
If you want better results, focus on hydration time, stable light, and a substrate that anchors growth without muddying your accounting. That is how a simple biomass estimate becomes a real, readable story about moss growth rate in an urban spot.


