
Urban moss is tougher than people give it credit for, and fragment propagation is the fastest way I know to turn a few pinches of moss into a living patch. When you get the basics right, moss propagation from fragments works on walls, planters, pavers, and those odd concrete corners that always stay a little damp.
This method is simple on paper, but it rewards careful handling and patience more than fancy products. If you treat moss like a seedling that needs roots, you will get frustrated, because moss plays by different rules.
The goal is to create many small starting points that can reattach, spread, and knit together over time. That means paying attention to moss fragment size, moss attachment methods, and humidity for moss growth, because those three decide whether your fragments grab on or dry out.
Why fragment propagation works for most common urban mosses
Mosses do not need a true root system to establish, so a small piece can restart growth if it stays moist and makes contact with a rough surface. In cities, that matters because you can scale up quickly from tiny scraps instead of hunting for intact mats.
Most sidewalk and wall mosses are acrocarps like Bryum and Grimmia, and they already handle drying and rewetting better than many garden plants. Fragment propagation fits their habit, because they naturally break apart and recolonize cracks after rain and foot traffic.
When you spread fragments, you create dozens or hundreds of growing tips, and each tip is a chance for attachment. That redundancy is why moss propagation from fragments has a higher success rate than trying to transplant a whole clump that might lift, curl, or die back in the middle.
Urban surfaces also create microclimates, like shaded north walls, leaky downspouts, and splash zones near faucets. Fragmented moss can exploit those small wet pockets better than a single big sheet that needs uniform moisture.
One more practical reason is that fragments let you match the moss to the site without committing to a large harvest. If your first test patch fails, you learn something about light, airflow, or humidity for moss growth without losing much material.
Choosing a source moss you can grow successfully
Pick source moss from a place that looks like your target spot, because moss is picky about moisture rhythm and light level. If you want moss on a sunny concrete planter, taking moss from deep shade under shrubs is a slow way to lose a weekend.
In most neighborhoods, you will find Bryum on compacted soil and mortar, Grimmia on brick and stone, and Ceratodon on disturbed spots like roof grit and roadside edges. These common genera usually tolerate fragment propagation well, and they rebound after drying.
Look for moss that is actively green after a rain, not gray and brittle even when wet. That simple check filters out patches that are already stressed by salt, dog urine, or chronic heat from sun baked masonry.
Avoid moss that is loaded with seedling weeds, algae slime, or black crust, because you will spend the first month fighting contamination instead of growing moss. I also skip moss from chemically treated areas like pressure washed walls or spots that get regular herbicide spray.
If you can collect from your own property, do it, because you can revisit the same microclimate and learn what that moss likes. When you must collect elsewhere, take tiny amounts from many spots rather than stripping one patch bare.
Collecting and cleaning fragments without damaging them
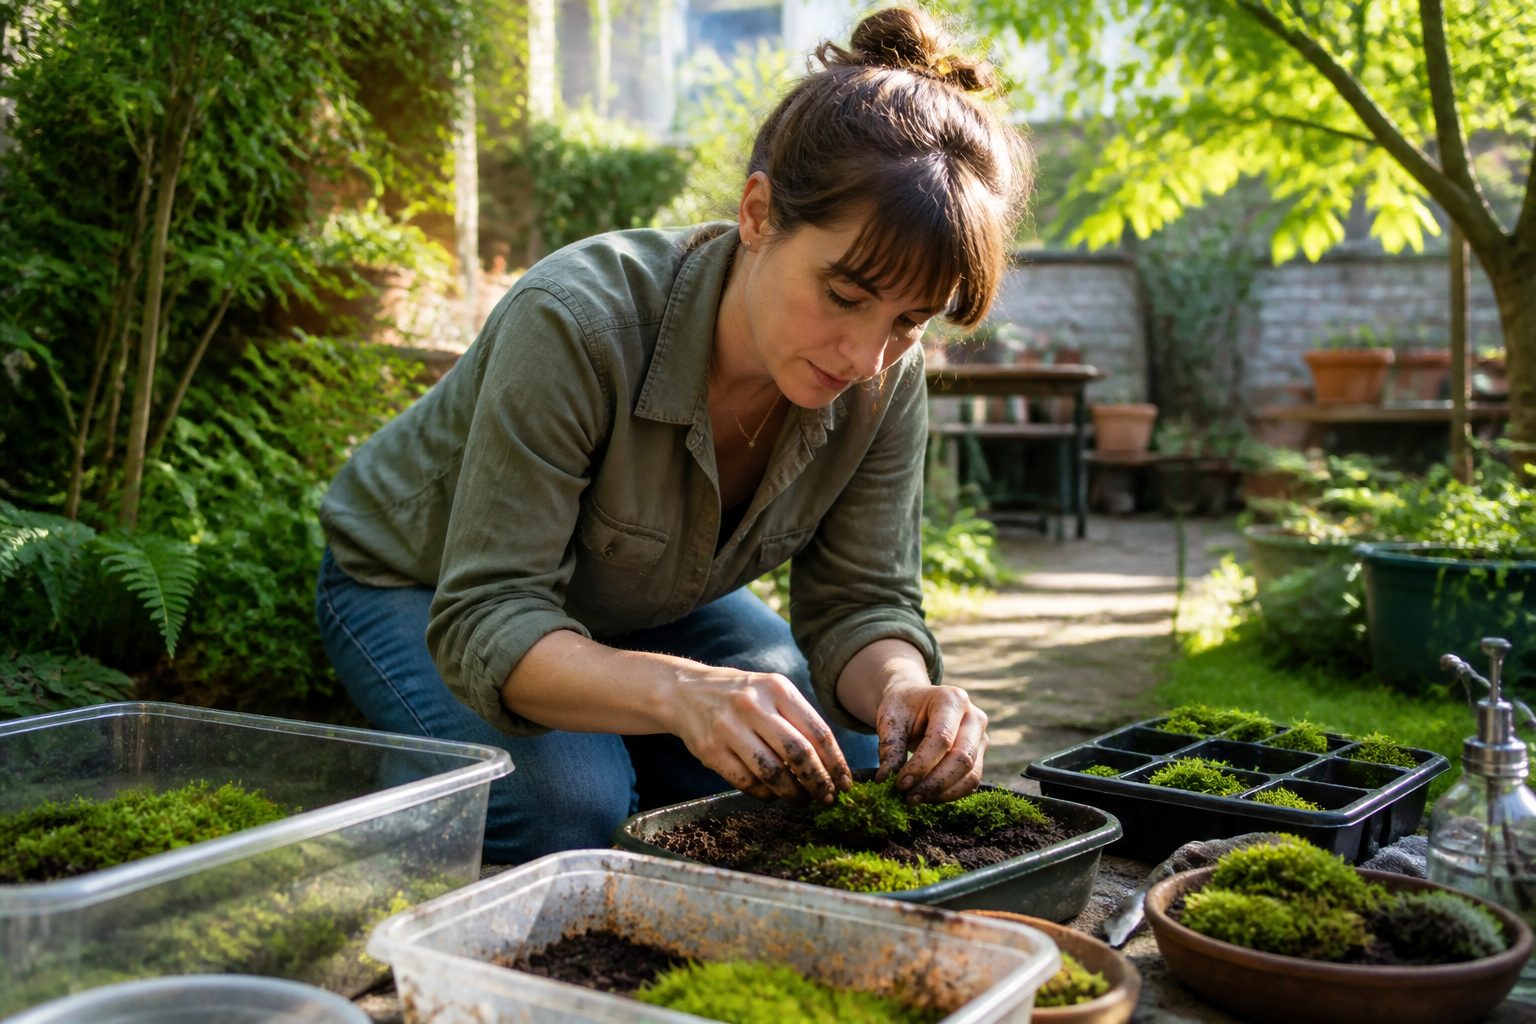
Collecting is where most beginners ruin the material, usually by yanking hard and pulling up a muddy mess. Use a thin putty knife, old credit card, or dull butter knife, and slide under the moss to lift it with minimal soil.
Cleaning is not about making the moss sterile, it is about removing grit that blocks contact with your target surface. If your fragments are full of sand, they sit on top like gravel, and your moss attachment methods will not matter much.
| Step | What to do | What to avoid |
|---|---|---|
| Lift | Slide a flat tool under the moss and peel gently | Pulling straight up and tearing stems |
| Rinse | Swish in cool water to drop grit and loose soil | Hot water or strong spray that shreds fragments |
| Pick | Remove twigs, leaves, and obvious weed seedlings by hand | Overpicking until you crush the moss |
| Drain | Press lightly in a sieve or on a towel to remove dripping water | Wringing like a sponge, which breaks stems |
| Hold | Store short term in a ventilated container with light moisture | Sealing wet moss airtight, which turns it sour |
Ideal fragment size and how to prepare an even mix
Moss fragment size decides how fast you get coverage and how easily pieces attach in cracks. Too large and the edges lift, too small and the fragments dry out before they can grab.
For most urban acrocarp mosses, I aim for fragments roughly the size of coarse coffee grounds up to small peas. If you can still recognize tiny stem clusters, you are usually in the right range.
You can make fragments by tearing with damp fingers, which is gentler than chopping with a knife. If you use scissors, make a few snips and stop, because mushy pulp spreads unevenly and tends to rot under high humidity for moss growth.
An even mix matters because thick clumps stay wet and go anaerobic while thin areas dry out. I spread the cleaned moss on a cutting board, break it up, then toss it lightly with my fingers like salad until the texture looks consistent.
If you are using a slurry approach, keep it chunky, not blended smooth. A blender makes a paste that looks clever, but it often smears into a film that peels off once it dries.
As a rough coverage guide, a loosely packed cup of fragments can spot seed about two to four square feet if you accept a speckled look at first. If you want a faster carpet, use more material and plan to mist more carefully so the thicker areas do not sour.
Picking the right surface: brick, concrete, wood, and stone
Moss attaches best to surfaces with texture, pores, and tiny ledges that hold water. Smooth glazed brick and sealed concrete are frustrating, and they make beginners blame their fragments when the surface is the real problem.
Brick is friendly when it is old, rough, and slightly crumbly at the mortar lines. New hard fired brick can still work, but you will get better results targeting the mortar joints and chipped corners.
Concrete is a mixed bag, because it can be porous and alkaline at the same time. If your concrete is new, rinse it a few times over a week and focus on shaded areas, because fresh alkalinity can slow establishment.
Stone varies by type, and that is where observation beats rules, because granite behaves differently than limestone. Rough sandstone and weathered flagstone usually take fragments well, while polished stone acts like a water slide.
Wood can work, but only if it stays damp and rough, like old cedar, untreated fence boards, or rotting logs in a planter. Pressure treated lumber and painted surfaces resist colonization, and they often shed fragments after the first dry spell.
Before you apply fragments, scrub off loose dust and flaky paint, then rinse and let the surface go damp, not dripping. A damp surface helps the first contact phase, and it reduces the chance that your mix blows away in a breeze.
Getting fragments to stick: pressure, texture, and micro-anchors
Attachment is mostly a physics problem, because the fragments need steady contact long enough to form new rhizoids. If fragments sit on top like confetti, they dry, curl, and vanish the first time a squirrel runs over them.
My favorite approach is simple pressure, meaning you press fragments into the surface with your palm or a gloved hand until they look slightly embedded. On vertical surfaces, I press in small sections and keep the layer thin so gravity does not win.
Texture is your friend, so use cracks, mortar lines, and chipped spots as natural pockets. If the wall is too smooth, I lightly roughen it with a stiff brush or coarse sandpaper, then rinse away the dust so it does not form a slick layer.
Micro-anchors are tiny things that pin fragments in place, like a dusting of fine clay, a smear of plain yogurt, or a thin paste of sifted compost. I do not treat these as magic ingredients, because the real win is that they hold moisture and keep fragments from sliding.
When I use a binder, I keep it minimal and avoid sugary mixes, because sugar feeds mold faster than it feeds moss. If you smell anything sour after a few days under a cover, you used too much binder or too much water.
Moisture setup: misting schedules and simple humidity covers
Humidity for moss growth is the make or break factor in the first two weeks, because fragments dry out before they attach. Your job is to keep them evenly damp while still letting oxygen reach the surface.
I prefer frequent light misting over heavy soaking, because soaking can float fragments out of place. Indoors or on a balcony, a fine pump sprayer twice a day is a solid starting point if the air is dry.
- Mist until the surface darkens, not until it runs
- Morning misting for daytime drying control
- Evening misting to prevent overnight crisping
- Clear storage bin cover with a small vent gap
- Plastic wrap tent held off the moss with chopsticks
- Remove cover for 30 to 60 minutes daily
Light and airflow: finding the “bright shade” sweet spot
Moss likes light, but most urban moss hates hot direct sun while it is trying to attach. Bright shade is the zone where you can read a book comfortably without squinting, and it is where fragments usually settle in fastest.
If you grow indoors, put the tray near an east window or a bright north window, and keep it out of the blast zone of heating vents. A cheap LED shop light can work too, but keep it far enough away that the surface does not warm up.
Airflow is the other half of the equation, because stagnant air plus high humidity for moss growth can turn into mold. I would rather mist a little more often than trap the moss under a sealed cover that never breathes.
Outdoors, avoid spots that bake in afternoon sun, especially on south facing concrete that holds heat into the evening. A north wall, the shaded side of a planter, or a spot that gets morning sun and afternoon shade is usually safer.
Watch the surface temperature with your hand, because your skin is a decent sensor for trouble. If the stone feels hot, your fragments will dry too fast and curl before they can attach.
If you see algae film forming, you likely have too much light for the moisture level you are providing. Reduce light a bit, increase airflow, and keep misting light so the surface cycles between damp and almost dry.
What to expect week by week: signs of success vs failure
Week one is mostly about survival, and the fragments may look unchanged or even a little worse. Do not panic if they brown at the tips, because many mosses green back up once they settle into a stable moisture rhythm.
By the end of week two, successful fragments start to look less fluffy and more glued down, especially at the edges. When you mist, they should darken and relax quickly instead of staying stiff like dried straw.
Week three is when you may see new growth points, often as tiny bright green specks or short upright shoots. This is also when uneven moss fragment size shows up, because big clumps stay dark and wet while fine bits start greening and spreading.
By week four, good patches resist a gentle fingertip nudge, and they do not slide as a sheet. If you can lift the whole patch like a sticker, your moss attachment methods did not create real contact, or the surface was too smooth.
Failure usually looks like one of three things, a slimy layer, a crispy layer, or a bare surface after the first windy day. Slimy means too wet and too sealed, crispy means too dry or too sunny, and bare means the fragments never got anchored.
Expect unevenness, because moss fills in slowly and tends to thicken where moisture lingers. If you want a uniform panel, plan on a second application at week four once the first wave has attached.
Common mistakes and quick fixes in the first month
The most common mistake is overwatering, because people treat moss like a terrarium plant that should stay wet all the time. If you see sour smell or translucent slime, pull back on misting and open the cover wider for better airflow.
Another common problem is using the wrong moss for the site, like shade moss on a bright balcony ledge. Fix that by moving the project to a shadier spot or by collecting a sun tolerant source moss from a nearby wall that already thrives in similar light.
People also underestimate surface prep, especially on dusty concrete where fragments sit on powder instead of the actual substrate. Scrub, rinse, and reapply, then press the mix in with real pressure so contact stays steady.
Fragment size errors are easy to correct, because you can rework what you have without starting over. If your mix is too coarse, break it up and fill gaps, and if it is too fine and crusty, add slightly larger bits that hold moisture longer.
Light mistakes show up fast, because bright sun plus misting can swing between scalding and drying in hours. Move the patch, add shade cloth, or even tape a piece of cardboard as a temporary sun block until the moss attaches.
If birds pick at your patch, you need a physical barrier, because misting will not solve that problem. A loose piece of window screen held off the surface with small spacers protects the fragments while still letting light and air through.
Conclusion
Moss propagation from fragments works when you respect what moss needs, which is contact, steady moisture, and reasonable light. Once you dial in moss fragment size, moss attachment methods, and humidity for moss growth, the process becomes repeatable across many urban surfaces.
Start small, watch what happens week by week, and adjust based on what you see rather than what a recipe says. A good patch is built from tiny wins, and those wins come from noticing when your moss is drying, sliding, or staying too wet.
After the first month, maintenance gets easier because attached moss handles short dry spells much better than loose fragments. If you keep one healthy source patch going, you will always have material for the next wall, planter, or sidewalk crack that looks like it wants to turn green.

