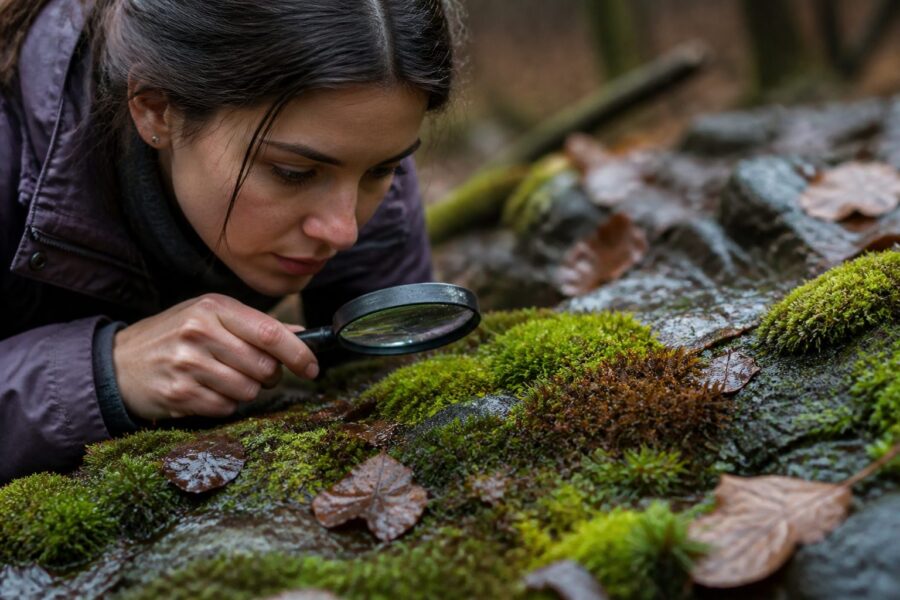
Rain turns moss from a tight, muted crust into something readable, and that is why moss identification after rain is often easier than on a dry afternoon. When the plants rehydrate, they show you how they actually hold their leaves, how they reflect light, and where the important structures sit.
If you have ever tried to name a sidewalk moss in midsummer, you know the frustration of looking at a brownish fuzz that refuses to open. A wet moss appearance fixes that problem fast, but it also creates a few new traps like glare and clumping.
This article focuses on what rehydrated moss does in the first minutes and hours after rain, and how to use those changes as identification clues. It also covers moss drying behavior, because the way a patch closes back up can be just as diagnostic as the way it opens.
Why rain is one of the best times to identify moss
Water makes moss look alive in a way that dry air hides, and that matters because most ID characters depend on leaf position. Moss identification after rain works well because many species shift from twisted, appressed leaves to spread, readable leaves within minutes.
Rain also boosts contrast between the moss and its substrate, especially on brick, asphalt, and concrete. The boundary of the patch gets sharper, and you can see whether the colony creeps as a thin sheet or builds into small hummocks.
When moss is wet, the leaves often become more translucent, which makes midrib features easier to spot with a hand lens. You may also notice tiny air bubbles trapped between stems, and those bubbles can trace the direction of leaf overlap.
Urban mosses that look similar when dry can separate cleanly when hydrated, especially acrocarps on sidewalks versus pleurocarps on shaded walls. After rain, the difference between upright tufts and creeping mats is usually obvious from a standing height.
Rain gives you a time window where the patch is fully open but not yet coated in dust again. If you want clean photos for later comparison, the hour after a shower often beats any other time of day.

Safety and ethics: where to observe and how to avoid damaging patches
Wet moss is soft, and that softness makes it easy to crush without noticing. If you step on a rehydrated moss patch, you can shear stems and smear the colony into a flattened stain that takes months to recover.
Choose observation spots where you can stand beside the patch, not on it, like the edge of a curb, the side of a planter, or the vertical face of a retaining wall. I avoid narrow sidewalks after rain because people have no choice but to walk through the moss line.
Use your phone zoom or a small hand lens instead of poking the patch with a stick. Prodding separates leaves and can fake characters like serrated margins or a “hair point” that is really just torn tissue.
If you collect at all, keep it tiny and legal, and do not strip a whole cushion from a single spot. A pea sized sample from a large, common patch is plenty for microscopy, and a photo record is often enough for field ID.
Watch for slick surfaces and runoff, because rain changes your footing as much as it changes the plants. I have seen people slide on algae coated concrete while leaning in for a close shot, and the moss loses every time.
What changes first: leaf spread, shine, and overall patch height
The first thing I look for in rehydrated moss is leaf spread, because it happens fast and it changes the entire silhouette. A patch that looked like a low crust can rise a few millimeters as stems re inflate and leaves lift away from the stem.
Shine is the next giveaway, and wet moss appearance varies from glassy to softly satin depending on leaf surface and papillae. If the patch looks glossy like wet plastic, you may be dealing with smoother leaves, while a duller wet look can point to roughened leaf cells.
| Immediate wet change | What you see in the first 1 to 10 minutes | What it can suggest |
|---|---|---|
| Leaf unrolling | Twisted leaves relax and spread outward | Many sidewalk acrocarps, including several Bryum and Tortula types |
| Patch “puffing” | Colony rises, cushions look thicker | Tuft forming species, often on soil caps and mortar |
| Surface shine shift | Glassy glare or a matte wet sheen | Smoother leaves versus papillose leaves, useful with a hand lens |
| Color lift | Brownish tones turn olive, green, or yellow green | Chlorophyll shows through, helps separate living tips from dead bases |
| Edge sharpening | Patch boundary becomes crisp against stone or bark | Growth form and colony spread pattern become easier to map |
Wet-state clues you should prioritize (and why they’re clearer)
When you do moss identification after rain, prioritize characters that depend on leaf position, because hydration puts leaves in their “natural” arrangement. Dry leaves often twist, fold, or press tight to the stem, and that can erase the whole pattern you need.
Look at the branch or stem outline first, because wet leaves show whether the plant is featherlike, pinnate, or just messy and irregular. Pleurocarps often show a tidy, flattened spray when wet, while many acrocarps look like little bottle brushes.
Check whether the leaves spread evenly around the stem or lean to one side. Secund leaves, where most leaves sweep in a single direction, can pop after rain and can be hard to confirm when the patch is dry and curled.
Use a hand lens to find the costa, because in wet leaves it often shows as a lighter stripe running up the center. On some species the costa ends midleaf, and on others it runs to the tip, and after rain you can trace that line more reliably.
Pay attention to color zoning within the patch, like bright green tips over tan bases, because hydration makes those zones obvious. That pattern can hint at growth rate, exposure, and whether you are looking at one species or a mixed patch.
Dry-state clues you should still capture before everything opens up
Dry moss has its own ID clues, and you lose them once the patch fully rehydrates. If you arrive during a drizzle or right after rain starts, take a minute to note the dry posture before it relaxes.
Moss drying behavior often shows up as twisting, crisping, or tight spirals at the leaf tips, and those patterns can separate similar looking species. Some sidewalk mosses form sharp, starry rosettes when dry, while others collapse into a smooth crust.
Look for pale hair points on leaf tips, because they stand out best when the leaf is folded and the hair point sticks forward. When wet, those hair points can lay down and disappear into glare, and you end up missing a major character.
Note whether the patch has a dusty, gray cast when dry, which can come from leaf papillae or trapped grit. After rain washes the surface, that dusty look can vanish, and the colony suddenly seems like a different moss.
Capture the dry edge texture too, because some species shrink back and reveal cracks in the mat while others stay continuous. Those shrink patterns are simple to photograph and surprisingly useful later when you compare wet versus dry shots.
A simple “mist test” when there’s no rain: what to do and what to note
If you cannot wait for weather, you can mimic moss identification after rain with a controlled mist test. Use clean water in a spray bottle, and mist lightly from a distance so you do not blast the colony apart.
Pick a patch you can revisit, because the point is comparison, not a one time look. I like mortar joints, shaded brick, and the soil line at the base of a planter, since they rehydrate evenly.
- Photograph the patch dry from 12 to 18 inches away
- Record the substrate, like brick, concrete, bark, or soil cap
- Mist until the surface darkens, then stop
- Wait 2 minutes, then take a second photo at the same angle
- Hand lens check for costa visibility and leaf direction
- Note how fast the patch greens up, slow or rapid
Comparing the same patch wet vs. dry: a two-photo method that works
The easiest way to learn rehydrated moss behavior is to photograph the same patch twice, once dry and once wet. I use a simple rule: same distance, same angle, and include one fixed reference like a crack line or pebble.
Start with a wider shot that shows the whole colony shape and its neighbors. Then take a close shot that fills the frame with the leaf texture, because you will want both scale levels when you key it out.
When the patch is wet, watch for the “open time,” which is the period when leaves are spread but not yet plastered down by heavy water. A light rain often gives you the best open time, while a hard downpour can mash everything flat.
On your phone, lock focus and exposure on the moss surface to avoid the camera brightening the scene and washing out the greens. Wet moss appearance tricks auto exposure, and you can end up with a pale, unhelpful image.
After the patch dries again, take a third photo if you can, because moss drying behavior is part of the story. Some mosses snap back to their dry form in an hour, while others stay half open for a full day in shade.
How rain reveals hidden features: costa, margins, and leaf arrangement
Rain can reveal the costa because hydrated leaves flatten enough for the midrib to show as a clean line. With a 10x hand lens, you can often see whether the costa is strong, faint, or double, and that narrows options fast.
Leaf margins are easier to judge when the leaf is spread, because you can see if the edge rolls under or stays flat. Revolute margins can hide in a dry curl, but after rain you can catch the rolled edge as a thin shadow line.
Leaf arrangement along the stem becomes readable when the plant rehydrates and stops twisting. You can check whether the leaves are in neat ranks, spiraled, or crowded near the tip, which helps separate common urban genera.
Rain also helps you find sporophytes, since wet setae often stand up and capsules look darker against green leaves. If you spot capsules, photograph them right away, because a breeze can shake them into the canopy of leaves and hide them.
Do not ignore the base of the stems, because hydration can reveal reddish or brown stem color through the leaves. That stem color can be a quiet clue that you will never notice in a dry, dusty patch.
When rain hides features: glare, clumping, and flattened mats
Rain helps, but it can also wreck your view, especially when water beads on leaf tips and reflects the sky. Glare can erase the costa and margins in photos, so move your body to change the angle and cut reflections.
Some mosses clump when soaked, and the stems stick together like wet hair. That clumping can fake a thicker growth form and make a creeping species look tufted.
Flattened mats are common after heavy rain on horizontal surfaces, like flat concrete or compacted soil. If the mat looks pancaked, wait for partial drying, because a slightly damp state often shows leaf structure better than fully soaked tissue.
Rain can also move grit, and that grit can lodge in the leaves and make margins look toothed. If you see “teeth” that vanish when you rinse gently with a few drops of water, you were looking at debris.
Do not trust color alone right after a storm, because mud splash can stain the patch and hide natural tones. I have miscalled a moss as yellow green when it was simply coated with clay tinted runoff.
Microhabitats after rain: runoff lines, drip edges, and splash zones
After rain, microhabitats become obvious, and moss follows water like a map. Runoff lines on stone often carry a thin ribbon of moss that stays hydrated longer than the surrounding surface.
Drip edges under railings, AC units, and roof overhangs can support species that you will not see on the drier wall nearby. If you want variety for practice, these drip zones are a better bet than random sidewalk squares.
Splash zones at the base of walls get hammered by droplets, and they often host tougher, low growing mats. Those patches can look boring when dry, but a wet moss appearance can show fine branching and leaf ranks.
Pay attention to transitions, like where soil meets concrete or where bark meets a metal signpost strap. Mixed moisture and mixed substrates often mean mixed species, and that is where misidentifications happen.
If you cultivate moss in an urban garden, these microhabitat cues translate directly to placement decisions. A species that thrives along a runoff streak may fail on a flat tray, even if both spots get watered.
Your repeatable post-rain ID workflow: observe, document, then narrow
A repeatable workflow keeps moss identification after rain from turning into random guessing. Start by naming the growth form in plain language, like cushion, tuft, sheet, or feathery mat, before you chase species names.
Next, document the setting with one sentence in your notes, like “north facing brick in shade, under gutter drip.” That context matters because many rehydrated moss patches look similar until you factor in sun, splash, and drying time.
Then do a quick lens pass for three things: costa strength, margin roll, and leaf direction on the stem. Those three checks are fast, and they stay useful even if you cannot see cell detail in the field.
After that, compare your wet and dry photos side by side and write down what changed. If the patch goes from tight curls to wide stars, or from flat to puffy, that moss drying behavior pattern can steer you toward the right group.
Only then should you open a key or field guide, because you will have better answers for the early questions. Keys punish vague observations, and rain gives you the chance to be specific if you slow down and record what you see.
Conclusion
Rain is a free lab experiment that runs on your nearest wall, curb, or planter, and it makes moss readable. If you build the habit of moss identification after rain, you will learn faster than you will from dry, half asleep patches.
Use wet state characters like leaf spread and costa visibility, but keep dry state notes too, because the before and after is where the best clues live. Rehydrated moss, wet moss appearance, and moss drying behavior are not side details, they are the main event.
Take the two photos, note the microhabitat, and treat the patch gently so it stays there for your next visit. The payoff is a personal reference library of real moss behavior, and that beats any single perfect picture from a guidebook.