Transplanting moss is the fastest way to get a real, continuous carpet, but it is also the quickest way to wreck a patch if you treat it like sod. Moss has no roots, so your job is to move a living skin without letting it dry, tear, or cook.
I like moss transplanting techniques because they reward patience and punish shortcuts in a very obvious way. If you rush the lift or skimp on moisture, you will see transplant shock in moss within days.
Urban surfaces make the process trickier because brick, concrete, and compacted soil swing between wet and bone dry. With the right moss handling tips, you can still move patches cleanly and get them to knit in with less dieback.
When to transplant moss instead of propagating from fragments
Transplant when you need instant coverage, like filling a visible strip between pavers or repairing a bald spot on a green roof tray. Fragment methods work, but they take longer and the early phase looks patchy.
I also transplant when the target site has tricky microtexture, such as rough limestone or old mortar joints. A whole mat already has a working structure that can grip that texture faster than loose bits.
Use fragments when you have a large area and a small donor patch, because you can stretch material without stripping a site. Fragment work is also better when you can keep the surface consistently damp for weeks.
Transplanting is a better call when the moss species grows as a cohesive sheet, like many pleurocarpous sidewalk mosses. When the growth form is tufted and crumbly, you may spend more time rebuilding a mat than you save.
If you are working in a public space, transplanting lets you place a finished patch and then stop watering sooner. That matters when you cannot babysit a slurry every day without drawing attention.

Choosing donor patches responsibly and selecting healthy material
Start with permission, because most of the best donor moss sits on someone else’s wall, roof, or stonework. If you cannot get a clear yes, do not take it, since a small harvest still leaves a scar.
A good donor patch is thick, springy, and evenly colored when damp, with minimal grit embedded in the stems. Avoid mats with lots of dead brown thatch underneath, because that material breaks apart during lifting.
Skip moss growing in runoff lines that carry oil, deicer salts, or roof shingle grit. You can move the contaminants along with the moss, and the new site may never settle into a stable chemistry.
Look for active tips, which often appear brighter and slightly translucent after a misting. If the patch perks up within a few minutes of water, it usually handles transplant shock in moss better.
Take small, scattered sections instead of peeling one big rectangle from a single spot. That pattern lets the donor site recover faster, and it keeps you from hauling home a mat that was already stressed at the edges.
Tools and prep: what to bring and how to keep moss hydrated
The biggest cause of dieback is simple drying during transport, so plan around moisture before you even touch the patch. Bring a spray bottle, a shallow tub with a lid, and a damp towel so you can keep the mat cool and humid.
I carry a thin putty knife, a flexible paint scraper, and a small hand brush, because different substrates release differently. These moss handling tips sound fussy, but the right tool keeps you from shredding the underside.
| Item | Why it matters | Quick use tip |
|---|---|---|
| Spray bottle with clean water | Prevents drying and heat stress | Mist the underside before lifting |
| Flexible putty knife | Slides under mats on soil or bark | Work in short strokes, not prying |
| Plastic tub or cooler | Keeps humidity high in transit | Line with a damp towel, lid cracked |
| Soft brush or old toothbrush | Removes grit without tearing stems | Brush the substrate, not the moss tips |
| U-shaped garden pins | Holds edges while moss reattaches | Pin through bare stems, not green tips |
Lifting moss: how to keep the mat intact
Water the donor patch first, then wait a minute, because damp moss flexes instead of snapping. Dry moss breaks at the stem base and you end up with confetti.
Slide your blade under the mat with a shallow angle and keep it moving like you are filleting fish. If you lever upward, you tear the living layer and bring up chunks of substrate you do not want.
On soil, aim to lift a thin layer of the top crumb with the moss, since that keeps the rhizoids attached. On stone, accept that you will get less substrate and focus on keeping the green layer continuous.
As each piece comes free, lay it green side up on a damp towel and mist the underside. Folding moss onto itself is fine for a short time, but keep it wet so the folded seam does not crisp.
Trim ragged edges with scissors instead of tugging, because tugging unzips the mat. Clean edges also make pressing moss into place later much easier.
Preparing the new site: cleaning, texture, and moisture
Most transplant failures come from putting moss onto a surface that is dirty, salty, or too smooth. If water beads and runs off, the moss cannot stay hydrated long enough to attach.
For stone and concrete, scrub with a stiff nylon brush and plain water, then rinse well. Avoid soaps and bleach, because residues can burn tips and trigger transplant shock in moss.
If the surface is slick, rough it slightly with a masonry rub stone or coarse sandpaper, then rinse the dust away. You want tooth, not deep grooves that create dry pockets.
On compacted soil, loosen the top quarter inch and remove leaf litter, because a spongy litter layer shifts and breaks contact. Moss needs steady contact, not a floating raft.
Pre-wet the site until it is evenly damp but not dripping, then wait a few minutes for shine to fade. That timing helps the mat settle without sliding around like a wet sticker.
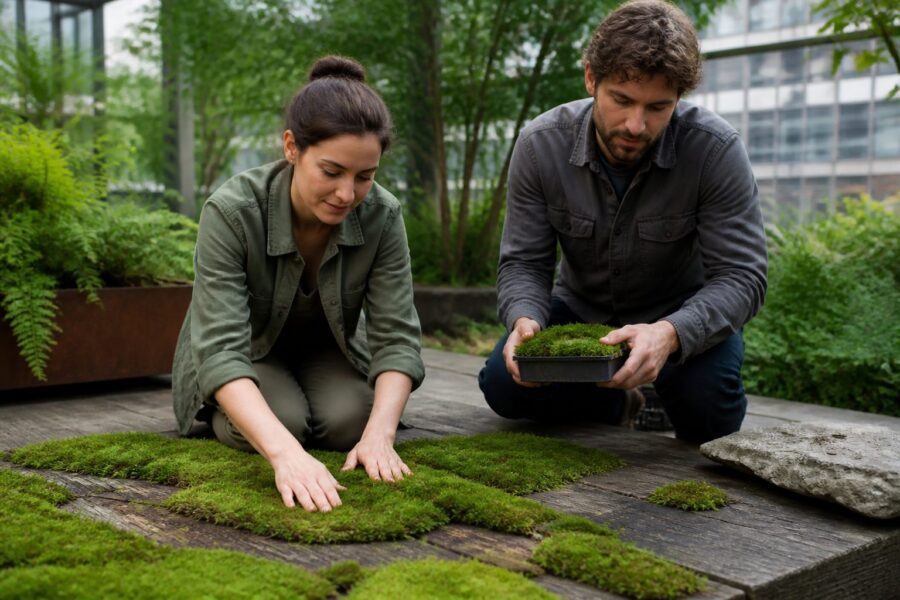
Attachment methods: pressing, pinning, and temporary netting
Attachment is where most moss transplanting techniques either work or fail, because contact matters more than almost anything else. If air sits under the mat, the underside dries and the patch peels back.
Start by fitting the patch like a puzzle piece, then use pressing moss into place with your palm or a clean grout float. Press firmly enough to seat the stems into texture, but do not grind the tips.
- Press with a flat palm or grout float
- Pin edges with U-shaped garden staples
- Use fishing line to tie mats on branches
- Lay jute netting for windy spots
- Add small stones as edge weights
- Mist immediately after final placement
Watering after transplant: the first 72 hours and first month
The first 72 hours decide whether the underside stays alive long enough to reattach. Mist lightly several times a day if the surface dries fast, especially on sun-warmed masonry.
Use a fine spray, not a hard stream, because you can float the mat and break contact. If you see edges lifting, stop watering for a moment and press them back down.
After day three, shift to deeper wetting less often, aiming for damp cycles instead of constant saturation. Constant wet can invite algae films that smother the moss tips.
In the first month, water based on the substrate, not the moss color, because many species look dull when dry and fine when rehydrated. I check by touching the surface under an edge, since that is where failure starts.
If you can only water weekly, choose a shadier site or use temporary netting to slow drying. Sparse watering in full sun is a recipe for transplant shock in moss and a crunchy perimeter.
Light and airflow adjustments to reduce stress
Match the new light level to the donor site as closely as you can, at least for the first couple weeks. Shade-grown moss moved into bright sun often bleaches at the tips even if you water well.
Temporary shade cloth, an upside-down crate, or even a piece of cardboard propped an inch above the patch can cut heat load. Keep the cover off the moss itself, because contact blocks airflow and encourages rot.
Airflow is a double-edged thing, since it dries the mat but also prevents stagnant films. If the site is sheltered and stays wet, back off watering and let it breathe between mistings.
On windy balconies or rooftops, slow the wind rather than fighting it with constant watering. A low windbreak panel or netting can reduce edge curl and keep pressing moss into place from being a daily chore.
Watch midday surface temperature with your hand, because hot stone can cook moss in minutes. If it feels uncomfortably warm to touch, add shade and water earlier in the day.
Signs of establishment: what you should see (and when)
In the first week, the best sign is boring, the patch stays flat and rehydrates evenly after misting. If it curls like a potato chip and only the center greens up, contact is failing.
By weeks two to four, you should see the edges stop shrinking and start looking fuzzy or slightly frayed with new growth. That edge fuzz is where the mat starts knitting to the substrate.
Look for color stability across wet and dry cycles, since severe transplant shock in moss shows up as persistent pale tips that never recover. Some browning at torn edges is normal, but it should not march inward.
On vertical surfaces, establishment shows up as the patch resisting a gentle fingertip push. Do not pick at it, but a healthy patch starts to grip instead of sliding.
After a month or two in good conditions, you may notice sporophytes on some species, especially in spring. Do not chase sporophytes as a goal, but their appearance usually means the colony is comfortable.
Repairing edges and gaps: patching strategies that blend in
Edges die back first, so plan to do minor repairs instead of expecting a perfect rectangle forever. I keep small scraps from the original lift in a damp tub for a week, just for touch-ups.
For gaps, cut a plug that slightly overlaps the hole, then feather the edge by trimming stems rather than compressing everything flat. The seam disappears faster when the two mats interlock instead of butting like tiles.
If a corner keeps lifting, pin it and reduce watering force, because repeated lift-and-press cycles shred the underside. This is where good moss handling tips pay off, since gentle fixes beat aggressive rework.
When you have lots of tiny voids, sprinkle a pinch of clean, damp fragments into the cracks and press them with a fingertip. Treat that as micro-transplanting, and keep it shaded until it darkens.
Avoid dumping soil or compost into gaps, because it invites weeds and changes the surface chemistry. If you need a filler on stone, use a dusting of the same grit you brushed off the donor site, then press the moss down again.
Conclusion
The best moss transplanting techniques are simple, keep the mat intact, keep it damp, and keep it in contact with the new surface. Most failures trace back to one of those three being ignored for a day or two.
If you take anything from this, take the idea that pressing moss into place is not a one-time step, it is a habit during the first week. A few calm minutes of re-pressing beats replacing an entire patch later.
Transplant shock in moss happens, even when you do everything right, so judge progress by attachment and regrowth rather than perfect color. With steady moisture and sane light, the patch usually rebounds and starts acting like it was always there.

