
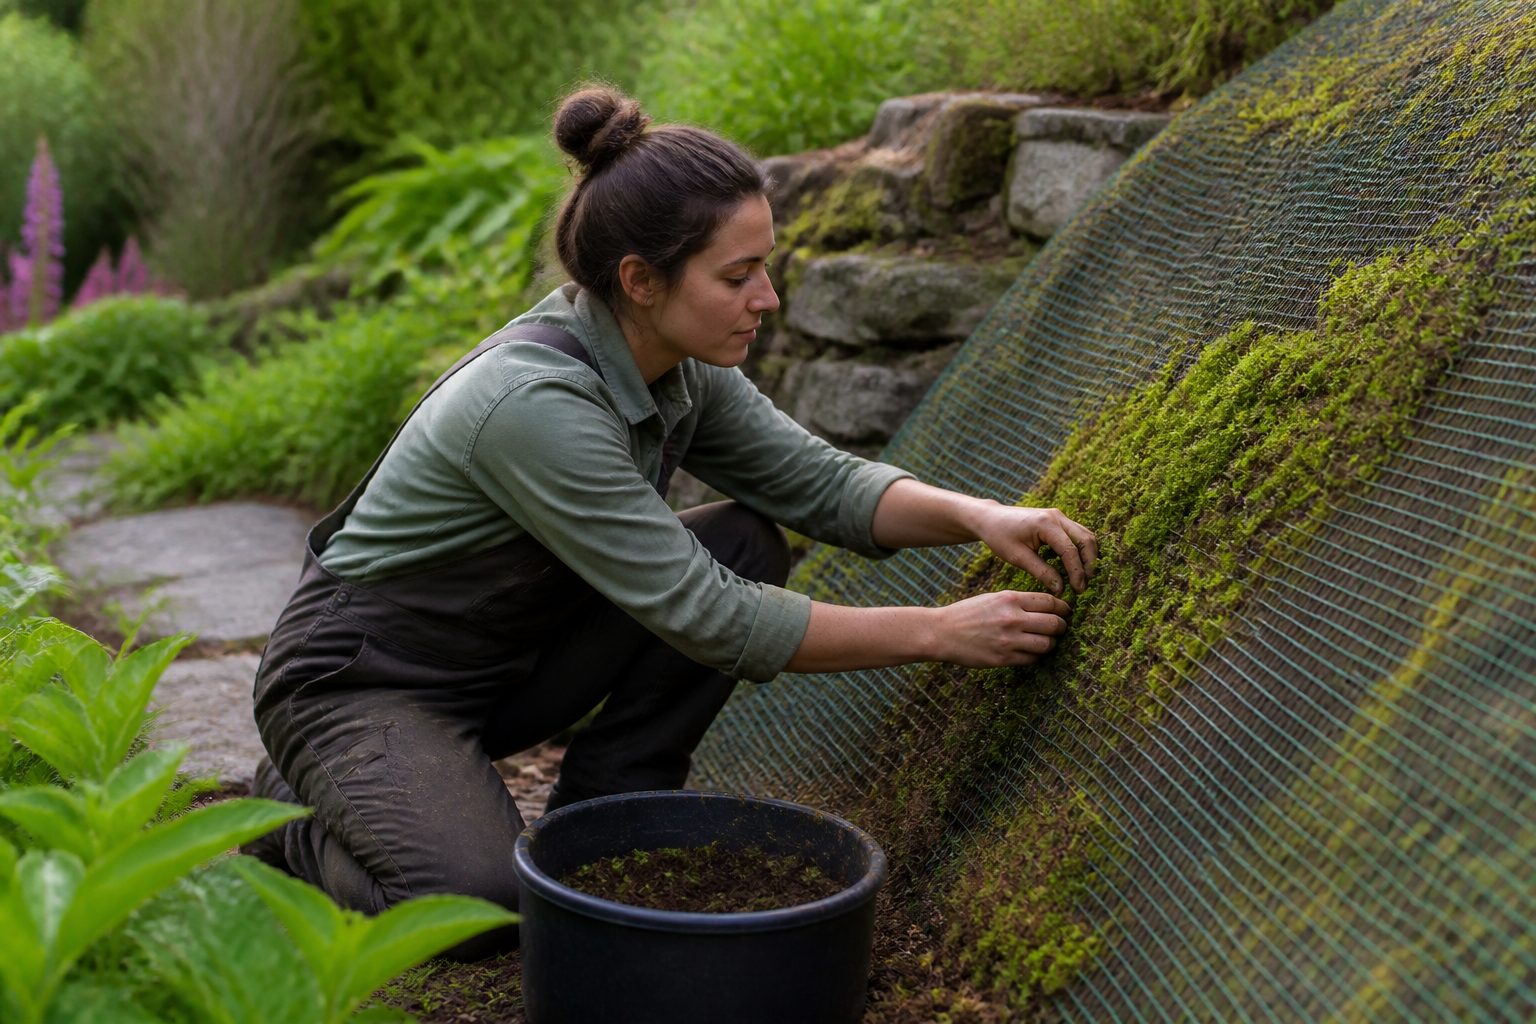
Moss is stubborn in the best way, but it still needs contact with a surface to grab on and stay put. When gravity, wind, or a hard rain keeps shifting your fragments, moss propagation with mesh becomes the method that stops the shuffle.
I use mesh when I want moss to root in place on slopes, in pots that get moved around, or on vertical surfaces that dry fast. The goal is simple, hold the moss down long enough for rhizoids to bite and new shoots to knit together.
Mesh also makes the work less precious because you can use smaller pieces and still get reliable coverage. If you have ever watched a nice patch slide two inches downhill overnight, you already know why this matters.
Why mesh helps: stability, contact, and moisture buffering
Moss needs steady contact more than it needs depth, since most species anchor with rhizoids that cling rather than true roots. Mesh presses fragments into the micro texture of soil, stone, or wood so the first week is not a constant reset.
On slopes, mesh works like a gentle seatbelt that keeps pieces from creeping downhill as you water. That stability is the first step toward erosion control with moss because the green cover cannot form if the material keeps migrating.
Mesh also spreads pressure across the surface, which helps when you pin or staple the edges. Without it, a pin can pierce and tear a thin mat, then the mat lifts and dries at the rip.
Moisture buffering is the quiet advantage people miss. A mesh layer breaks up airflow right at the surface and slows evaporation, especially on sunny, exposed faces.
If you mist through mesh, droplets land and wick sideways instead of blasting fragments away. That matters on vertical installations where the wrong nozzle turns watering into a pressure washer.
Choosing mesh types: biodegradable vs reusable options
Pick mesh like you pick a pot, based on how long you need it and how much you want to see it. For most outdoor projects, biodegradable mesh is the easiest because it disappears as the moss knits.
Jute netting is my default biodegradable mesh for soil slopes because it drapes well and takes pins without tearing. Coir netting is tougher and lasts longer, which helps on steeper grades or spots that get foot traffic nearby.
Cotton gauze can work for small pots, but it breaks down fast if it stays wet and warm. That can be fine indoors where you can remove it early, but outdoors it can fail before the moss has locked in.
Reusable options include plastic garden mesh, fiberglass window screen, and stainless steel mesh for harsh sites. Plastic is cheap and easy to cut, but it can trap debris and look messy if you leave it too long.
For vertical walls, I like a rigid mesh that holds tension without sagging, because sagging creates dry pockets and loose seams. If you care about microplastics, stick with natural fibers or plan to remove reusable mesh once the moss is stable.
Preparing the base: soil, stone, or wood under the mesh
Mesh cannot fix a bad base, it only holds moss against whatever you give it. Before you start moss propagation with mesh, decide if you want the moss to live on nutrients from soil, minerals from stone, or a thin biofilm on wood.
On soil, rake off loose mulch and break up crust so the surface has fine texture for rhizoids to grip. On stone or brick, scrub algae and dust, then rinse well so the moss contacts clean mineral rather than slime.
| Base surface | Prep steps before mesh | What to avoid |
|---|---|---|
| Soil slope | Rake smooth, tamp lightly, pre-wet to field moisture | Loose mulch, fluffy compost, dry powdery top layer |
| Concrete or brick | Scrub with stiff brush, rinse, roughen glossy spots | Soap residue, thick algae film, sealed surfaces |
| Natural stone | Remove lichens only where needed, rinse grit, keep crevices | Acid cleaners, pressure washing, polished faces |
| Wood or bark | Soak and rinse, remove peeling paint, add moisture-retentive backing if vertical | Treated lumber leachate, flaky rot, oily woods like cedar heartwood |
Selecting moss material: fragments, small plugs, or thin mats
Your source material decides how fast the project looks finished and how well it survives mistakes. I treat fragments as the most forgiving option for beginners because you can spread risk across hundreds of tiny pieces.
Fragments work best when they include stems and growing tips, not just brown bases. If you gather ethically, take a little from many spots and skip rare species, because moss grows slow and scars can last.
Small plugs are great when you want predictable spacing, like a grid on a pot or a living wall panel. Plugs also help on windy sites because each plug has more mass under the mesh and resists flipping.
Thin mats give instant coverage, but they demand careful handling and even pressure. If a mat bridges over a bump under the mesh, the air gap dries the underside and that section turns crispy.
Match species to the site instead of forcing a favorite moss into the wrong microclimate. For sun and drought, Syntrichia and Grimmia types often behave better than shade mosses that expect constant humidity.
Layout planning: coverage density and seam placement
Planning layout sounds fussy, but it saves you from patchy results that take a full season to hide. Decide whether you want fast green coverage or a slower knit that uses less donor material.
For fragments, I aim for a peppered look where no bare spot is larger than a couple inches across. If you can see big empty islands, you will fight algae before the moss can claim the space.
For plugs, place them closer at edges and corners because those zones dry first and fail first. The center usually stays humid under the mesh, so it can tolerate wider spacing.
Seams matter more than people admit, especially on vertical surfaces. Overlap mats like shingles so water runs over the seam rather than under it and peeling the edge.
When you cut mesh panels, plan overlaps so you do not create a hard ridge that casts a dry shadow line. A small overlap with extra pins beats a tight butt joint that opens after the first freeze and thaw.
Installing mesh: pinning, wrapping, and tension control
Installation is where moss propagation with mesh either looks clean or looks like a craft project that blew up in the wind. You want firm contact without strangling the moss, and that means controlled tension.
On soil, I use U-shaped landscape staples or galvanized sod pins, then I add extra pins on the downhill edge because water and gravity tug there. On pots, I wrap mesh under the rim and tie it off so the rim carries the load instead of the moss.
- Pre-wet the base before placing moss
- Press moss pieces flat with a gloved hand
- Lay mesh with a slight slack, not drum tight
- Pin edges first, then pin the center to remove bubbles
- Add extra pins at seams and downhill edges
- Trim loose mesh tails so they do not wick and flap
Watering strategy: soaking through mesh without washing moss away
Watering is the make or break step, because moss dries fast but also floats when you blast it. The sweet spot is a slow soak that penetrates the mesh and base without moving the fragments.
Use a pump sprayer on a gentle fan or a watering can with a rose, and keep the stream angled so it lands softly. If you see pieces shifting under the mesh, your pressure is too high or your mesh tension is too loose.
For the first two weeks, I water more often than I think I should, then I taper once I see new green tips. Daily misting can work indoors, but outdoors a deeper soak every couple days often holds moisture longer.
Hard tap water can leave mineral crust on mesh and moss, especially in arid cities. If your hose water leaves white spots on pots, collect rainwater or use filtered water for the early establishment phase.
On vertical surfaces, start watering at the bottom and work upward so runoff does not peel edges as it gains speed. If you can, add a drip line or a slow trickle above the panel for ten minutes instead of a fast spray for one.
Light and microclimate: keeping edges from drying out
Light is not just brightness, it is heat and airflow, and moss reads all of it. The same species that thrives on a north wall can burn on a west wall that gets hot afternoon sun.
Edges dry first because they get more airflow and less shared humidity from neighboring moss. If you want fewer failures, treat edges like a separate zone and give them extra density, extra pins, and extra water.
On balconies and rooftops, wind can turn mesh into a drying rack. A simple windbreak, like a trellis panel or a row of planters, can raise humidity enough to keep tips from browning.
Shade cloth is useful, but do not hang it so close that it blocks rain and traps stale heat. I like 30 to 40 percent shade for sun exposed starts, then I remove it as the moss thickens.
If your site swings between wet nights and hot days, aim for species that tolerate desiccation and rehydration without turning to mush. For many urban growers, that choice matters more than any fertilizer, since moss hates rich feeding anyway.
When to remove mesh (and when to leave it in place)
Removing mesh too early is a classic mistake because the surface looks stable before it is anchored. I wait until I can gently lift an edge of mesh and see the moss resisting, with new growth threading through or around the openings.
Biodegradable mesh is easy to leave alone if it is not smothering growth. Jute usually loosens and blends into the mat over time, while coir can persist and stay visible longer.
Reusable mesh is worth removing once the moss has knitted, because it can trap leaves and create rot pockets. If you used plastic mesh on a wall, plan a careful removal day when the moss is damp and flexible.
On steep slopes, I often leave some mesh at the top edge even after the center has anchored. That top strip acts like a guard against shear during heavy storms, which supports erosion control with moss when runoff spikes.
If the mesh starts cutting into thickening moss, loosen or remove it because compression can cause yellow lines. You want contact, not a tourniquet, and mature moss can handle more movement than fresh fragments.
Common failures: slipping, algae takeover, and patchiness
Slipping usually means the base was dusty, the surface was too steep for the pin pattern, or the mesh had too much slack. Add more pins, especially at seams and downhill edges, and do a thorough pre-wet so pieces stick on day one.
Algae takeover is a sign of constant wetness and too much nutrient, often from rich potting soil or runoff from fertilizer nearby. Switch to a leaner base, reduce watering frequency, and increase airflow without adding harsh sun.
Patchiness often traces back to uneven light or uneven contact under the mesh. If one corner dries faster, treat it like a separate micro site and add a small patch of extra moss under the same mesh panel.
If you see moss turning black and slimy, you kept it wet with no oxygen exchange, especially indoors under plastic. Remove any cover that traps humidity, let the surface breathe, and water less but more deeply.
Pinning moss too aggressively can also cause failures because pins create stress points that tear when the moss swells and shrinks. Use more pins with less force, and choose wider head staples when you can.
Conclusion
Moss propagation with mesh works because it respects what moss needs most, steady contact and steady moisture without turbulence. Once you get that right, the moss does the rest in its own slow, stubborn way.
Choose biodegradable mesh when you want a low maintenance install, and choose reusable mesh when you can commit to removing it cleanly. Either way, good pinning moss technique and gentle watering beat fancy products every time.
If your goal is erosion control with moss, treat the first month like a protection phase rather than a growth phase. Stable seams, dense edges, and patient watering turn a fragile start into a surface that holds through storms.
Take notes on which spots dry first and which spots stay slimy, because every wall and slope has its own quirks. The second install always looks better than the first, mostly because you stop fighting the site and start working with it.
When the mesh finally disappears under new tips, you will see why this method is worth the extra setup time. The payoff is a moss cover that stays where you put it, even on hard urban surfaces.

