If you want fast, reliable moss ID in the city, stop staring at the whole plant first and start with the leaf rib. Moss identification by costa is one of the few field traits that stays useful even when a patch is beat up by foot traffic and grit.
The costa is the midrib that can run up the center of a moss leaf, and once you train your eye, you can see it with a hand lens and decent light. It is also a trait that many beginner guides mention but rarely explain in plain, practical terms.
Urban mosses love to hide their best features when they are wet, curled, or packed tight against concrete. This article focuses on what the costa looks like in real conditions, so your IDs hold up on sidewalks, bark, and soil patches.
What the costa is and why it’s a high-value ID feature
The costa is a thickened strip of tissue that runs along the leaf center, and many people casually call it the moss midrib. Under a lens it can look like a clear line, a pale band, or a darker spine depending on the species and the light.
For moss identification by costa, you are usually answering a few blunt questions: is there a costa, how many are there, and how far do they go. Those answers narrow options faster than color, which changes with moisture and sun exposure.
The costa matters because it tracks big groups, not tiny quirks, so it is stable across a patch. If you learn to see a single costa versus a double costa, you can separate lookalikes that otherwise blend together on a wall.
It also behaves well under abuse, and that is why I lean on it in urban work. A moss can lose capsules, get mowed, or get sandblasted by winter grit, yet the costa pattern on new leaves still shows up.
One warning though, the costa is not a magic key by itself. Some species have a faint costa that disappears unless you prep the leaf, so you still need to pair costa traits with leaf shape and habit.
How to view the costa: backlighting, leaf spread, and focus tricks
Backlighting is the fastest trick, and it works even with a cheap hand lens. Hold a small tuft between you and the sky or a phone flashlight, and the costa often pops as a darker or brighter stripe.
Leaf spread matters more than people admit, because tightly appressed leaves hide the rib under overlap. Use a pin, toothpick, or the tip of a pocketknife to tease one leaf away from the stem without shredding it.
For focus, stop trying to see the whole leaf at once. Rock the lens slightly and lock onto the centerline first, then follow it toward the tip while you keep the leaf flat.
If the moss is soaking wet, blot it on your shirt or a paper towel for ten seconds. A dripping leaf throws glare that makes a single costa look broken or doubled.
When you can, view both sides of the same leaf. Some mosses show the costa more clearly from the back of the leaf, especially when the lamina cells are thin and translucent.
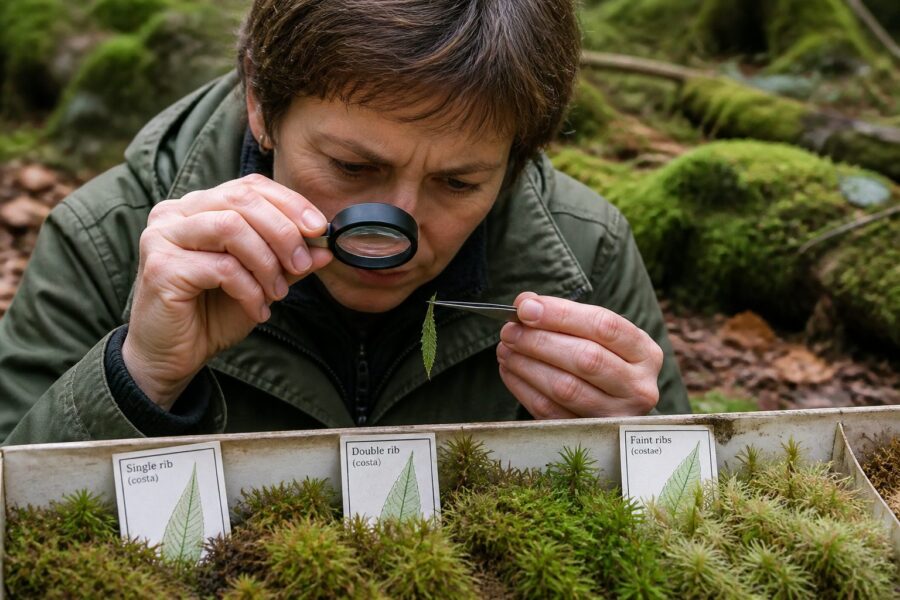
Strong single costa: what “reaches the tip” really means
A strong single costa is the classic look most people imagine for moss identification by costa, a clear midrib running straight up the leaf. The phrase “reaches the tip” sounds obvious, but in the field it has a few meanings that trip people up.
In many species the leaf tip is a tiny, narrow point, and the costa can fade right before it. You should treat “reaches the tip” as “stays distinct into the apical region,” not as “touches the last micrometer of the point.”
| What you see at the leaf tip | What it usually means | Field note for single costa |
|---|---|---|
| Costa clearly visible into the tip region | Long, strong single costa | Common in many upright acrocarps on soil and mortar |
| Costa fades in the last 5 to 10 percent | Percurrent or nearly percurrent | Call it “to near the tip” and verify on several leaves |
| Costa extends beyond the leaf as a short awn | Excurrent costa | Check that the awn is costa tissue, not a torn margin |
| Costa ends well below the tip | Short costa | Measure relative length, since leaf size varies within a tuft |
Short costa vs. long costa: measuring with simple reference points
You do not need a ruler, but you do need a consistent way to talk about length. I use fractions of the leaf, like one third, half, two thirds, or almost to the tip, and I stick to those terms.
Pick a leaf that looks typical for the tuft, not the tiniest new leaf and not a shredded old one. Then trace the costa from the base upward and note where it fades compared to the full leaf length.
A short costa often ends around one third to one half of the leaf, and it can look like it simply stops. A long costa usually runs past two thirds and stays obvious even when the leaf margin curls.
Be careful with leaves that have a long, hairlike tip, because a costa can end at the start of the hairpoint and still count as long. In those cases, treat the green blade as the leaf for your fraction, and treat the hyaline tip as a separate feature.
Check at least five leaves from one patch before you lock in the call. Urban mosses can mix species in a single square inch, and a stray leaf can fool you into thinking the costa length varies wildly.
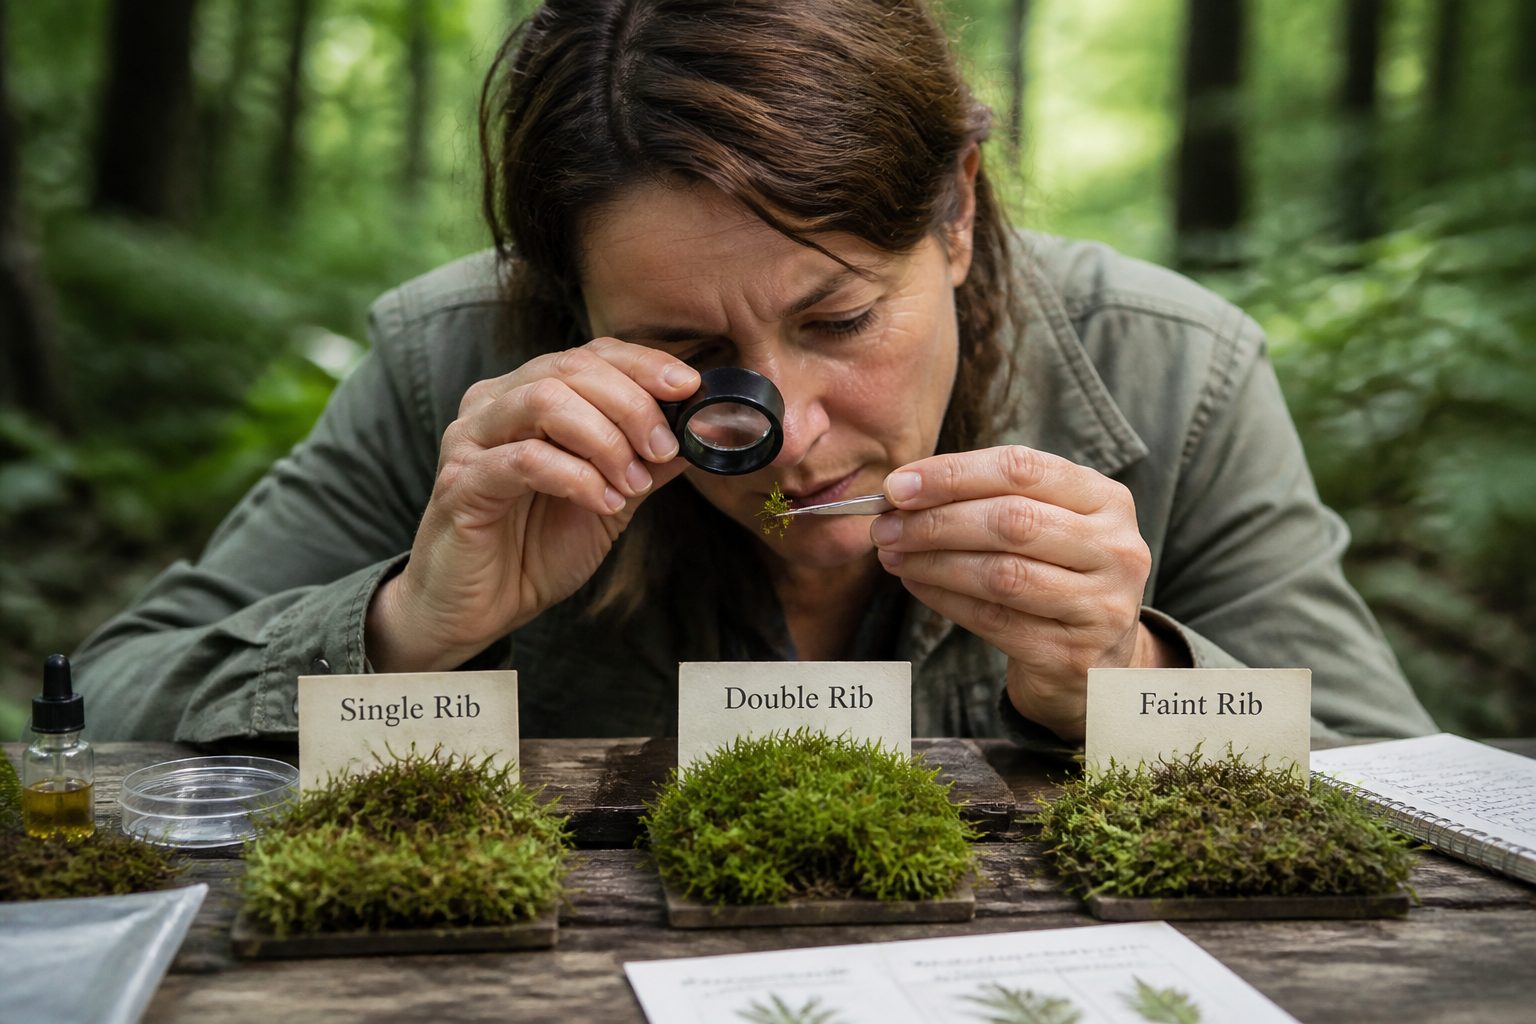
Double costa: how to spot two ribs without confusing folds
A double costa means two parallel ribs that start near the leaf base and run upward, usually with a clear gap between them. It is a strong clue in moss identification by costa, but it is also easy to misread when leaves are creased.
To confirm a true double costa, find the base of the leaf and watch for two distinct lines emerging early. If the “second rib” appears only midleaf, you are probably seeing a fold or a shadow from a curled margin.
Backlight the leaf and rotate it slightly, because folds move with the angle while real costae stay put. A real double costa also tends to keep similar thickness on both sides, while a fold has a sharp highlight and then disappears.
Some leaves show a strong single costa plus thickened margins, and that combo can fake a double costa at a quick glance. Follow each line down to the base, because thickened margins usually connect to the edge, not the center.
When the leaf is tiny, a phone macro clip lens can help more than a stronger hand lens. The extra working distance lets you flatten the leaf with a pin and still keep the ribs in focus.
No costa or very faint costa: when “absent” is a careful call
Calling a costa absent sounds simple, but it is one of the easiest ways to mis-ID a moss. Many species have a faint costa that only shows under backlight, and in dry weather it can vanish into the leaf texture.
Start by looking for any thickening at the leaf base, because even a weak costa often begins as a pale band there. If you see nothing at the base on multiple leaves, then “no costa” starts to look real.
Use side lighting as a second check, because a costa can show as a low ridge even when it is the same color as the lamina. Tilt the leaf and watch for a narrow line of shadow that tracks the center.
Be honest about uncertainty, especially on glossy leaves where glare erases detail. I write “costa absent or very faint” in my notes until I can recheck under steadier light.
Remember that some mosses have a short, weak costa that stops early, and that can look absent if you only check the top half. Always scan from the base upward, even if you think you already know the answer.
- Check the leaf base first, not the tip
- Use backlight, then confirm with side light
- Blot wet leaves to cut glare
- Look at five to ten leaves per patch
- Verify that the centerline is not a fold
- Note “absent or faint” when visibility is poor
Costa thickness and color: what can help and what can mislead
Costa thickness is useful when it is extreme, like a stout rib that looks almost like a little stem inside the leaf. It is less useful when you try to split hairs, because thickness changes with leaf size and hydration.
Color can help too, since some costae are yellowish, reddish brown, or noticeably paler than the blade. City grime can stain leaves, so treat costa color as a supporting clue, not a deciding one.
A thick costa often makes the leaf look keeled, like a shallow V, especially when dry. That keel can trick you into thinking there are two ribs, so always confirm by backlighting the flattened leaf.
Watch out for glare on wet leaves, because glare makes the costa look pale and wide. In harsh sun I step into shade or use my body as a light block, and the costa becomes easier to read.
If you are growing moss indoors, strong LED lighting can exaggerate color differences in the costa. I prefer neutral light when I am making notes, because purple grow lights make every midrib look weird.
Costa endings: excurrent, percurrent, and ending below the tip (plain language)
Once you see the costa, the next step is how it ends, because endings are often more consistent than overall plant size. These terms sound technical, but the ideas are simple when you tie them to what your eye sees.
Percurrent means the costa runs to the tip and stops there. In practice you are looking for a rib that stays clear right up to the end of the green blade.
Excurrent means the costa keeps going past the leaf tip and sticks out as a little point or awn. Make sure that point is centered and continuous with the rib, because torn leaf tissue can fake an excurrent tip.
Ending below the tip means the costa fades out before the leaf apex, sometimes far below. That trait pairs well with other features like a broadly rounded leaf tip or a sharply toothed margin, depending on the group.
If the leaf has a long hairpoint, write down whether the costa enters the hairpoint or stops at its base. That one detail can separate two sidewalk species that otherwise look like the same scruffy green fuzz.
Common errors: wet leaves, glare, and leaf curling that hides the rib
Wet leaves are the top reason people misread a single costa as broken, doubled, or absent. Water beads act like tiny mirrors, and your lens ends up showing reflections instead of structure.
Glare is worse on smooth, glossy mosses that grow on painted wood, brick, or metal edges. If you cannot change the light, change the angle, because a small tilt often turns a washed out leaf into a readable one.
Leaf curling is sneaky because it can hide the centerline under a rolled margin. If the leaf looks like a tube, gently flatten it with a pin against your fingertip or a scrap of paper.
Overlapping leaves cause false lines, especially when you look at a stem without isolating a single leaf. Pull one leaf free and view it alone, because moss identification by costa needs a clean view of one blade.
Dirty patches add their own problems, since dust fills in grooves and makes the costa look thicker. A quick rinse in a bottle cap of water, followed by blotting, often restores the true look.
Combining costa traits with leaf shape for a stronger match
Costa calls get stronger when you pair them with leaf shape, because shape gives context to what the rib is doing. A long single costa in a narrow lanceolate leaf points you toward a different set of mosses than the same costa in a broad, ovate leaf.
Look at the leaf tip while you track the costa, because blunt tips and sharp tips often line up with different costa endings. A percurrent costa paired with a clearly pointed tip reads differently than a percurrent costa paired with a rounded tip.
Margins matter too, since recurved edges can make the costa appear more central and more prominent. If the margins roll back, flatten the leaf before you decide whether the costa is truly thick or just visually boosted.
In many urban acrocarps, a strong single costa plus an obvious hairpoint is a common combo on exposed soil and mortar. On tree bark, you often see flatter pleurocarps where the costa can be short, faint, or absent, and the leaf shape does more of the work.
Write your notes as a bundle, like “single costa, long, percurrent, leaf lanceolate, tip acute,” and you will match keys faster later. When you only write “single costa,” you lose the details that separate the usual suspects.
A repeatable checklist you can use on sidewalks, bark, and soil patches
Consistency beats fancy gear, so I use the same routine whether I am on a shaded brick wall or a sunny curb. The goal is to make each moss identification by costa decision repeatable, so you can trust your own notes.
First, pick a clean, typical tuft and take leaves from the middle, because edge leaves are often damaged. Second, check moisture, blot if needed, and then choose one leaf to isolate and flatten.
Third, backlight the leaf and decide: no costa, faint costa, single costa, or double costa. Fourth, follow the costa upward and record the length in fractions, then record the ending type in plain language.
Fifth, sanity check the call by looking at several leaves and confirming the pattern repeats. If the costa pattern changes leaf to leaf, you may have mixed species, and you should separate stems before you go deeper.
Finally, pair your costa notes with leaf shape and growth form, and take one quick photo through the lens if you can. Even a slightly blurry photo can remind you later whether you saw a true double costa or a fold.
Conclusion
Once you get comfortable seeing the moss midrib, the city starts to look less like random green fuzz and more like a set of readable patterns. Single costa, double costa, and faint costa calls become quick, and you stop second guessing every patch.
The trick is to treat the costa as a field character with rules, not as a vague line you sometimes notice. With backlighting, a flattened leaf, and a consistent checklist, moss identification by costa becomes one of the most dependable tools you can carry.