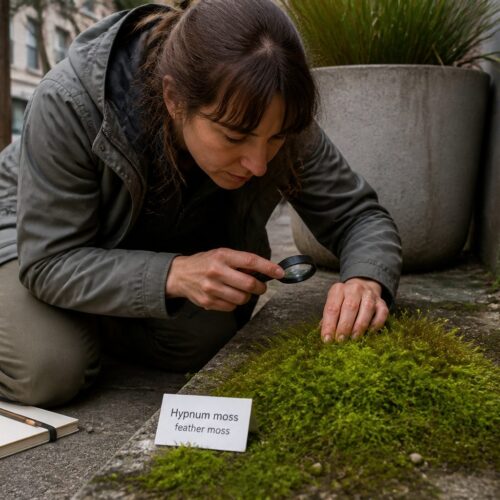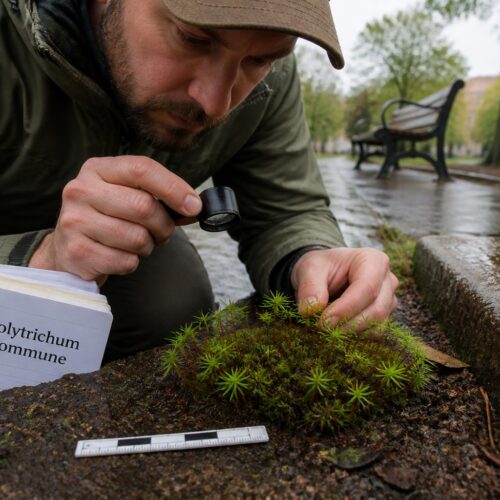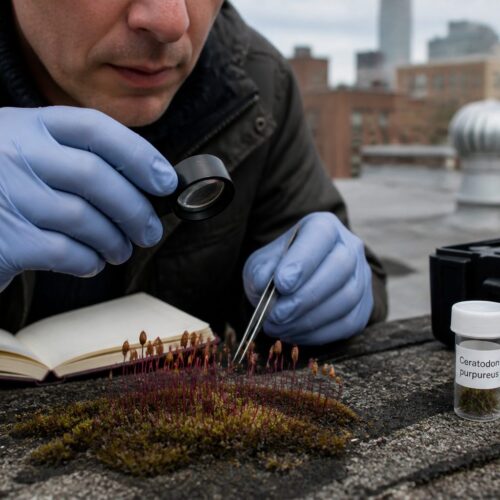
In city moss hunting, capsules are the part that makes you stop and stare, because they look like tiny lamps and matchsticks stuck into the green. If you learn a few capsule shapes, you can start sorting mosses fast, even when the leaves all blur together.
This article sticks to plain terms and the kinds of capsules you actually see on sidewalks, brick walls, planters, and roof edges. The goal is moss identification by capsule shape that works with a hand lens and a phone camera.
I like capsule based ID because it forces you to look at structure instead of color, which changes with wet weather and shade. Capsule shape, seta length, and capsule orientation stay more consistent than most beginners expect.
Why capsule shape is helpful even when you don’t know the species
Capsules are the spore cases, and they are built for spore release, not for looking pretty. That function gives you reliable shapes like round, oval, cylindrical, and curved that repeat across groups.
Leaves can trick you in cities because dust, salt spray, and drought shrink them or make them curl. Capsules keep their basic proportions, so moss identification by capsule shape often beats leaf based guessing on a quick walk.
Even if you cannot name the moss, you can still write something useful like “upright cylindrical capsule on a long red seta.” That kind of note narrows options later when you compare photos or keys.
Capsule shape also helps you avoid common mix ups, like confusing a small acrocarp lawn moss with a pleurocarp creeping moss. Many pleurocarps in cities have short setae and sideways capsules, while common acrocarps often lift capsules higher.
I treat capsule traits like a quick sorting system, then I check leaves only after I have a short list. You can do the same with three cues, moss capsule shape, seta length, and capsule orientation.
When you’ll see capsules in cities and how to spot them quickly
In many temperate cities, capsules show up most often from late winter through spring, then again in fall if rains return. The timing varies by species, but the pattern is simple, look after wet weeks followed by a few mild days.
Sidewalk cracks and mortar joints dry fast, so mosses there often rush to fruit when moisture finally holds for a while. Green roofs and shaded retaining walls can keep capsules around longer because they stay humid.
To spot capsules fast, stop looking for green and start looking for thin stalks catching light. A low sun angle makes setae flash like tiny wires above the cushion.
After rain, capsules can stand out because the leaves darken and the stalks look cleaner by contrast. In dry weather, the stalks still show, but you may need to crouch and scan from the side.
If you only have ten seconds, search the edges of moss patches where growth is newest and less buried in debris. Capsules often rise from the center of a tuft, but you usually notice them first at the patch margin where the view is open.
Capsule basics in simple terms: capsule, lid, stalk, and mouth
A moss capsule is the spore container, and it sits at the end of a stalk called the seta. The capsule often has a lid, called an operculum, that pops off when the capsule is ready to shed spores.
The “mouth” is the opening where spores leave, and many mosses have toothy structures around it that control spore release in dry air. You do not need to memorize the tooth types to use moss identification by capsule shape, but it helps to know where to look.
| Part | What it looks like in the field | Why it matters for ID |
|---|---|---|
| Capsule | Spore case, round to cylindrical, sometimes curved | Main cue for moss capsule shape and proportions |
| Operculum (lid) | Cap on top, often conical or beaklike | Changes the silhouette, can fall off at maturity |
| Seta (stalk) | Thin stem lifting the capsule above leaves | Seta length and thickness vary a lot by genus |
| Mouth (opening) | Rim under the lid, sometimes with visible teeth | Confirms maturity and helps compare capsule orientation |
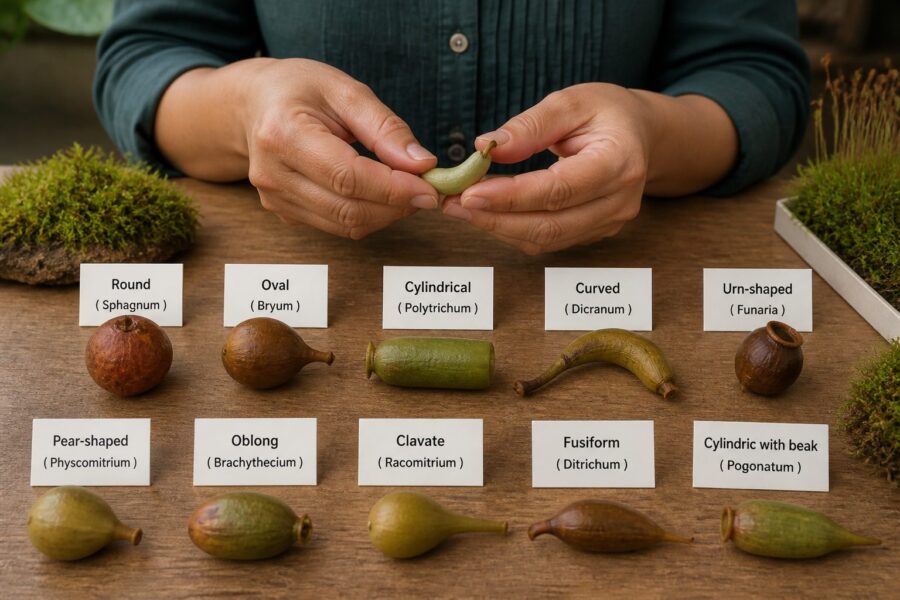
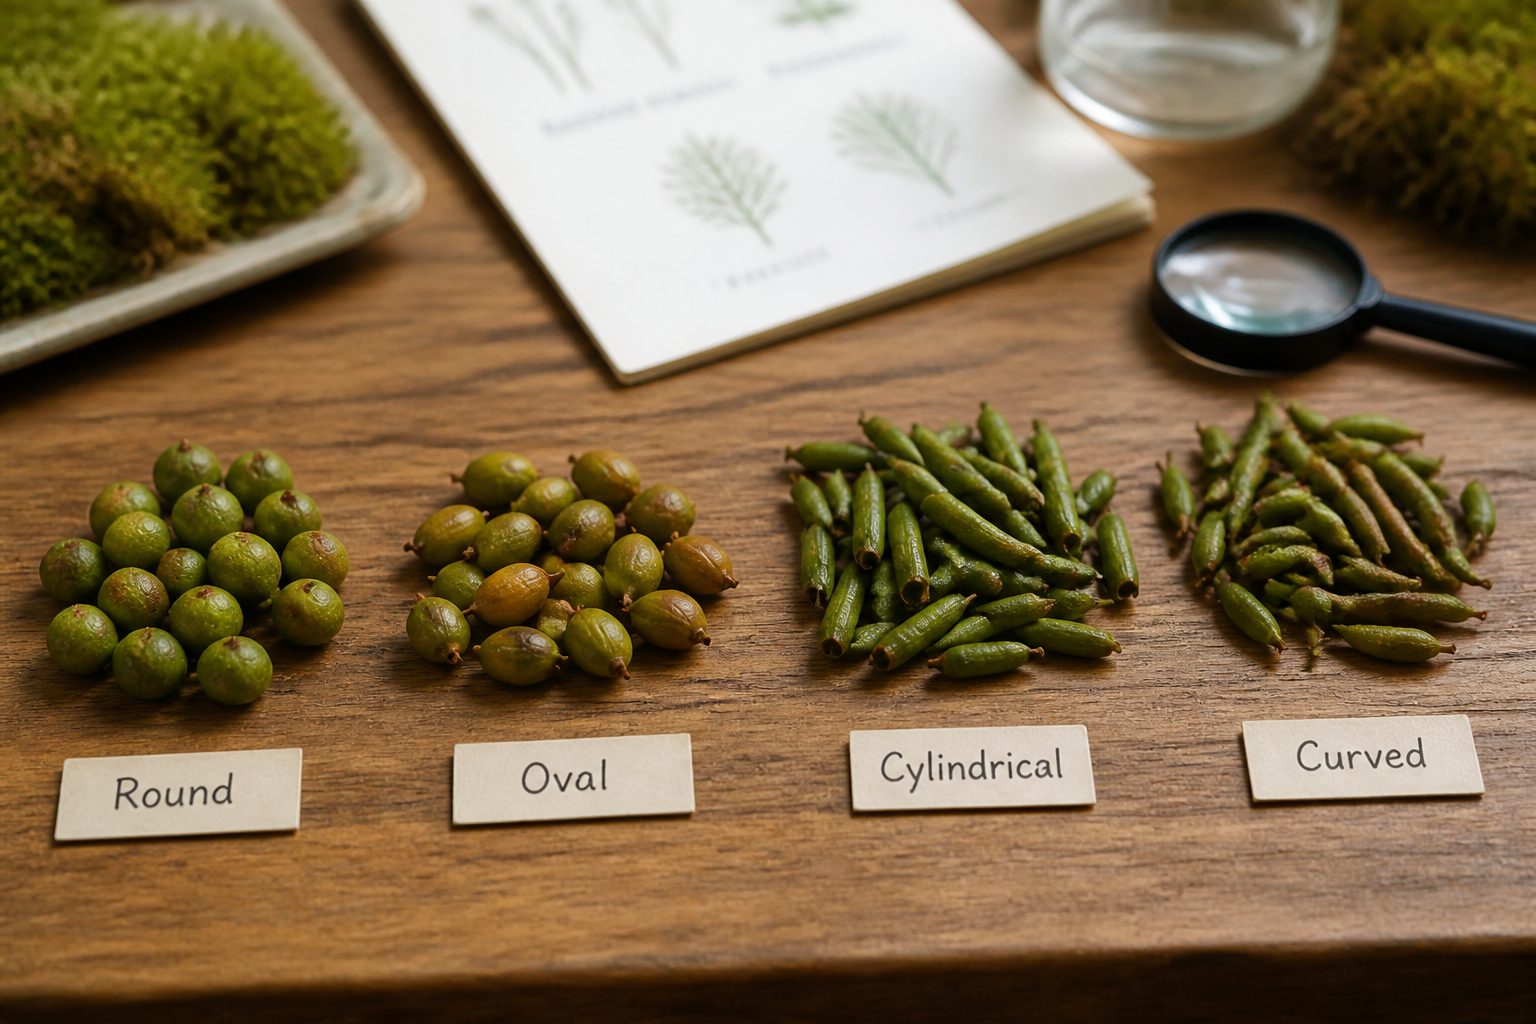
Round and egg-shaped capsules: what to look for beyond “oval”
Round capsules look like tiny peas or beads, and they often read as “ball on a stick” from a distance. Egg shaped capsules look similar but have a clear wider end and a narrower end.
When you call something oval, push yourself to name which end is fat and which end is narrow. That one habit makes your notes more useful than a vague “oval capsule” line in a field notebook.
Check whether the widest point is near the base where the capsule meets the seta, or closer to the top near the lid. Many common urban mosses have a slightly swollen base, which changes the silhouette when viewed from the side.
Look for a short neck, which is a narrowed section at the base of the capsule, because it can make a capsule look more “pear shaped” than egg shaped. A neck can be subtle, so tilt your lens and catch the outline against a pale background like concrete.
Also watch for a beaked lid, because a long lid can make a round capsule look more oval at first glance. If you see a sharp point at the top, note it separately from the capsule body so you do not mix lid shape with moss capsule shape.
Cylindrical capsules: long forms and how to compare proportions
Cylindrical capsules are the “hot dog” category, and they are common on soil, brick, and compacted planter beds. They range from short barrels to long pencils, so you need a proportion habit, not a single label.
A quick proportion trick is to compare capsule length to capsule width in your head. If it looks about twice as long as wide, write “short cylindrical,” and if it looks three to five times as long, write “long cylindrical.”
Then compare capsule length to seta length, because that ratio is surprisingly consistent in some moss groups. A long capsule on a very short seta gives a compact, top heavy look, while a small capsule on a long seta looks like a lollipop.
Pay attention to whether the sides look parallel or slightly tapered toward the lid. A gentle taper can separate two mosses that both look “cylindrical” until you slow down and sketch the outline.
City grit can coat capsules and blur edges, so wipe nothing and just change your viewing angle. When you move your head, a true cylinder keeps the same width profile, while a tapered capsule gives away its shape as the highlight slides.
Curved and leaning capsules: distinguishing arched stalks from bent damage
Curved capsules catch attention because they look like tiny bananas or hooks, and beginners often assume any bend is damage. Some mosses naturally hold the capsule at an angle, and some naturally curve the seta like a fishing rod.
The first thing I check is whether many capsules in the same patch bend the same way. If every capsule leans in a similar arc, you are probably seeing a normal trait, not a dog paw incident.
- Compare at least five capsules in one patch
- Look for smooth, even arcs in the seta
- Check for a kink point that suggests a snap
- Note whether the capsule body itself is curved or only the stalk
- Inspect for crushed lids or torn mouths
- Scan nearby patches for the same capsule orientation
Upright vs. drooping capsules: orientation as a consistent clue
Capsule orientation sounds simple, but it is one of the most dependable field cues you can record quickly. Some mosses hold capsules upright like candles, while others droop like little bells.
Orientation can stay consistent even when capsule shape varies a bit within a patch. That is why capsule orientation pairs well with moss identification by capsule shape instead of competing with it.
Upright capsules often look tidy and centered over the tuft, especially on compact acrocarp cushions. Drooping capsules often swing to the side, which makes them easier to see from above because the capsule body sticks out beyond the leaves.
Wind and rain can push capsules around, so do not judge from a single stalk. If most setae hold the same angle relative to gravity, write it down as a trait and ignore the odd ones.
If you are photographing, take one shot straight down and one at eye level to show the droop. A top down photo can make a drooping capsule look upright because you lose the gravity cue.
Stalk (seta) length and thickness: quick comparisons you can make
Seta length is the first “scale” clue, because it tells you how far the capsule rises above the leafy part. In cities, you can compare it to familiar things like sand grains, brick pores, or the width of a sidewalk crack.
I like three quick bins, short setae that barely clear the leaves, medium setae that lift capsules clearly above the tuft, and long setae that wave above everything. You do not need millimeters for a useful note, you need consistent comparisons.
Thickness matters too, because some setae look like hair and others look like wire. A thicker seta often holds a heavier capsule more steadily, which can affect capsule orientation in wind.
Color can help you see thickness, since reddish brown setae stand out against green leaves and pale concrete. Still, do not trust color alone, because wet setae darken and dry setae can bleach in sun.
When you write notes, pair seta length with capsule shape in one phrase, like “long seta with short barrel capsule.” That combined description is usually enough to match your observation to a photo guide later.
Capsule surface texture: smooth vs. slightly ridged looks
Texture is easy to miss because capsules are tiny, but a hand lens makes it obvious on many species. Some capsules look smooth and glossy, while others show faint ribs, wrinkles, or a matte finish.
Ridges often run lengthwise on cylindrical capsules, and they can make the capsule look squarer in cross section. If you see repeating lines, rotate your view and check whether the lines stay in place as true ribs.
Urban dust can fake a matte texture, especially on capsules close to traffic. If the capsule looks dull, look for one capsule tucked deeper in the patch, since it often stays cleaner and shows the real surface.
Some capsules have a distinct boundary between the capsule body and a narrowed neck, and that boundary can look like a crease. That “crease” is a structural clue, so note it even if you cannot name it.
Texture notes work best when you tie them to shape, like “smooth oval capsule” or “ridged long cylinder.” That keeps your record focused on moss capsule shape while still adding a detail that separates lookalikes.
Immature vs. mature capsules: color changes and what features appear later
Immature capsules often look plump, pale green, or yellowish, and they can hide the final shape. As they mature, they usually darken to tan, brown, or reddish brown, and the outline sharpens.
The lid can stay on for a long time, so a mature looking capsule may still be closed. Once the operculum falls, the mouth region becomes the star of the show, and you may see teeth with a lens.
Do not assume a capsule is “old” just because it is dark, because sun exposure can brown a capsule early. I trust structure before color, then I use color as a supporting clue.
Immature capsules can also sit more upright, then shift as the seta dries and twists. If you are tracking capsule orientation, check a patch over a few days and see whether the angle changes with drying.
For moss identification by capsule shape, the best time is often just before the lid comes off, when the capsule is full sized and clean edged. If you can find both immature and mature capsules in one patch, photograph both because they answer different questions.
How to document capsules for later ID work: angles that matter
A single photo rarely captures capsule shape, seta length, and capsule orientation at once. You need a small set of angles, and you should take them the same way each time so your archive stays useful.
Start with a side view at capsule height, because that shows the silhouette, the neck, and the droop. Then take a top down shot to show how the capsule sits over the tuft and whether capsules cluster or scatter.
Take a close shot of the mouth area if the lid is off, because teeth and the rim can confirm maturity. If the lid is on, photograph the lid shape anyway, since a beak or cone changes the outline you might otherwise call “oval.”
Include one scale reference that does not destroy the patch, like the edge of a coin held near the moss or a ruler placed beside it. If you do not want to carry tools, use a known object like a standard house key, but keep it consistent.
Write one line of notes right after the photo, because memory lies fast with small structures. I record moss capsule shape first, then seta length, then capsule orientation, and only then do I add habitat like “brick mortar, shaded, north wall.”
Conclusion
If you want a practical entry point to urban bryophytes, start with capsules and keep your categories simple. Round, oval, cylindrical, and curved capsules cover a lot of city mosses, and they train your eye quickly.
When you pair moss identification by capsule shape with seta length and capsule orientation, you get notes that stay useful months later at your desk. That is the difference between “I saw a moss” and “I can probably name this moss next time.”
Capsules come and go, so take advantage of fruiting seasons and document what you see while it is there. A few clean photos and consistent wording will beat a dozen vague snapshots every time.
Urban mosses live hard lives, and they still manage to build these precise little spore machines on sidewalks and walls. Once you start noticing capsule shape, you will catch yourself scanning every damp brick corner for the next clue.
Keep your ID process honest, describe what you can prove from the capsule, then use keys or local checklists to finish the job. That approach stays grounded, and it makes capsule based learning stick.