Leaf margins are one of the fastest ways to narrow down a moss name, especially when you are working with tiny plants on a brick wall or a sidewalk crack. If you can get confident about whether the edge is smooth, toothed, or rolled under, moss identification by leaf margins gets a lot less fuzzy.
Urban mosses take a beating from grit, drought, and foot traffic, so their leaves do not always look “textbook” at first glance. The trick is learning what a real moss leaf edge looks like when it is clean, hydrated, and viewed at the right angle.
This article sticks to field-friendly methods, because most city growers and balcony bryologists do not want to set up slides and stains every weekend. You will use a hand lens, a phone camera, and a few simple habits that make the moss leaf edge easier to read.
Why leaf margins matter for moss ID in urban settings
In cities, you often see the same few moss genera repeating on different surfaces, and their overall look can blur together. Leaf margins cut through that confusion because the edge traits stay fairly consistent even when the plant is stressed.
A cushion moss on a concrete capstone can look like a different species once it dries and shrinks. The margin, whether it stays entire or shows a toothed leaf margin, usually still gives you a reliable clue.
Margins also help when capsules are absent, which is most of the year for many urban colonies. If you can sort “smooth vs serrate vs recurved margins,” you can often land in the right genus before you ever see a sporophyte.
Urban substrates exaggerate certain traits, like curling leaves on sunny walls or compact growth on thin soil. That is why pairing margin traits with where the moss grows, on asphalt seams, mortar, bark, or shaded stone, makes IDs more repeatable.
For cultivation, margins matter because they hint at how a moss handles drying and airflow. A species with recurved margins often tolerates exposed sites better than a thin-leaved species with a delicate smooth margin.
Getting a clean look: moisture, glare control, and magnification tips
Most margin mistakes come from looking at a dry, dusty sample under harsh light. Start by misting the patch with clean water and waiting two minutes so the leaves relax and spread.
Glare hides teeth and makes rolled edges look smooth, especially on wet leaves. Shade the moss with your hand, or angle a small card to block direct sun while you inspect.
A 10x hand lens is enough for many serrations, but 15x to 20x makes moss identification by leaf margins much easier. If you only have a phone, use the 2x or 3x camera lens and move the phone back slightly to improve focus.
Pull one or two leaves with tweezers and place them on a dark, matte surface like a black plastic lid. A single leaf on a clean background beats squinting at a whole clump every time.
Look at the margin from two angles, top-down and slightly from the side. Rolled edges and thickened borders often show up only when you tilt the leaf and catch the rim as a line.
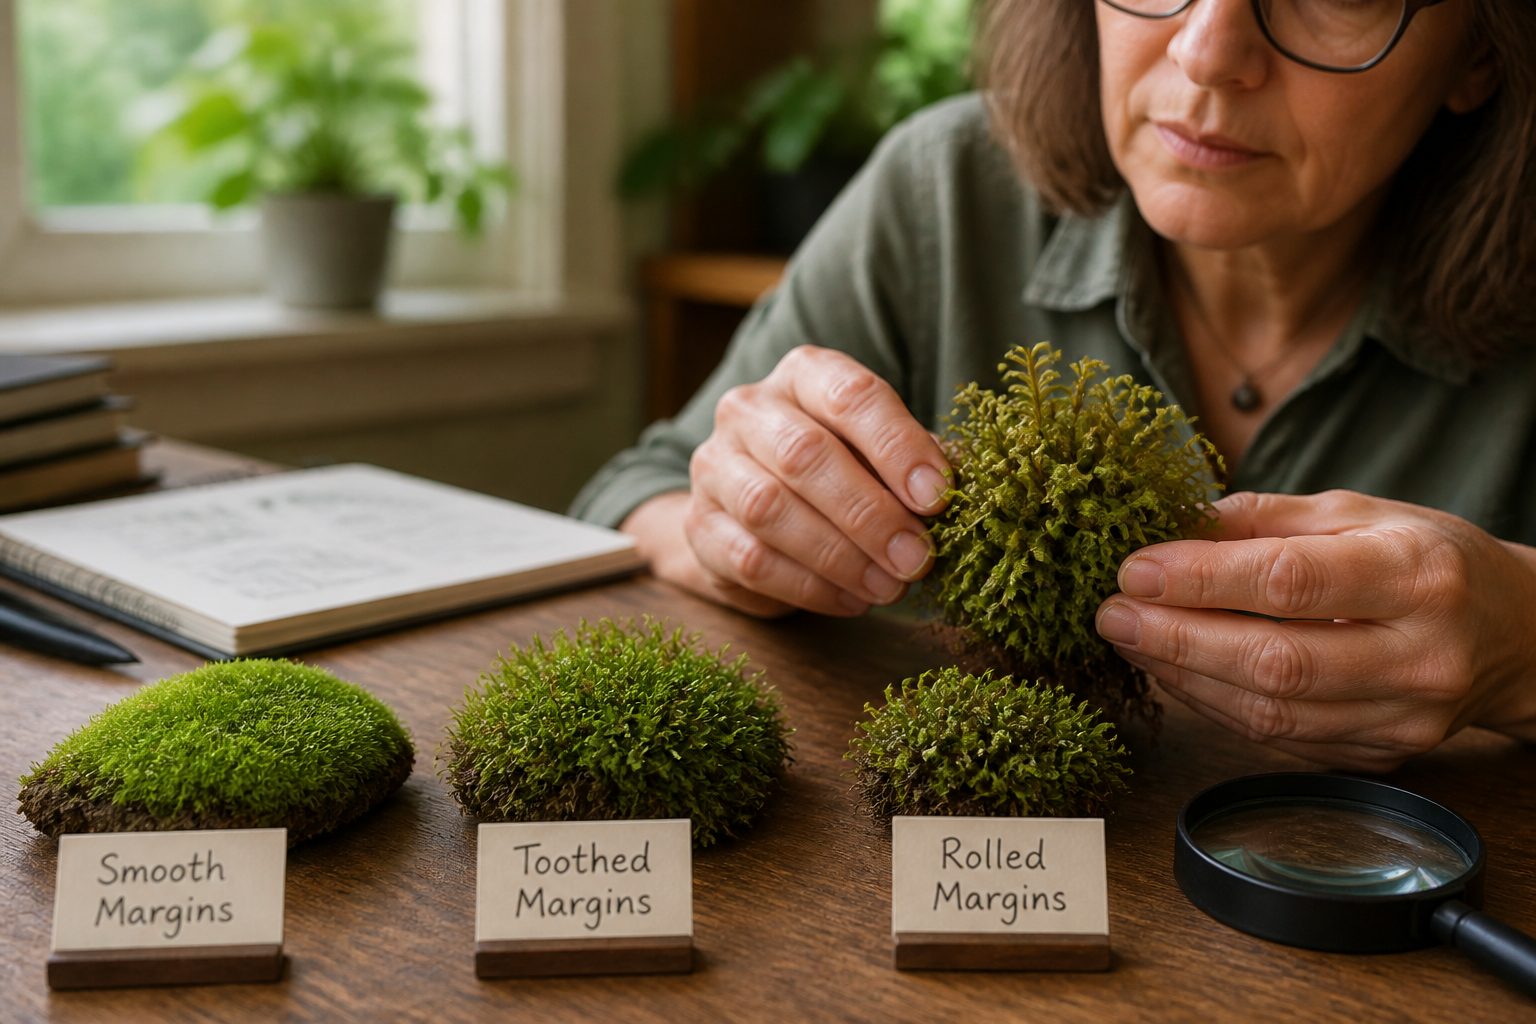
Smooth margins: how to confirm they’re truly entire
A smooth margin means the edge looks even, without obvious teeth, bumps, or a ragged outline. The problem is that dust and torn tissue can fake a toothed look, so you need a quick confirmation routine.
First, pick a leaf from the middle of a healthy shoot, because outer leaves are often damaged. Then rinse the leaf in a drop of water and gently drag it across a fingertip to remove loose grit.
Under a hand lens, an entire moss leaf edge looks like a clean curve from base to tip. If you see irregular nicks that change from leaf to leaf, you are probably seeing wear, not true teeth.
Check both margins, because one side can be torn while the other stays intact. A real toothed leaf margin usually repeats on both sides in a consistent pattern.
Finally, compare the margin near the base to the margin near the tip. Many species look smooth at the base but turn slightly toothed near the apex, and that detail matters when you write notes.
| What you see | Likely meaning | Quick check |
|---|---|---|
| Even curve, no bumps, both sides match | Truly smooth, entire margin | Inspect 3 leaves from mid-shoot |
| Random jagged spots, different on each leaf | Torn tissue or abrasion | Choose fresher inner leaves |
| Edge looks fuzzy or granular | Dirt, algae, or biofilm on the rim | Rinse and re-check under shade |
| Smooth base, faint roughness near tip | Weakly toothed near apex | Zoom on the top third of the leaf |
Toothed margins: what “serrate” looks like at hand-lens scale
A serrate margin in mosses usually means tiny teeth pointing toward the leaf tip, like a very fine saw. At hand-lens scale, the key is repetition, because real teeth show a steady rhythm along the edge.
Start by focusing on the upper half of the leaf, since many urban species show teeth most clearly near the apex. If the edge looks like it has a zipper-like outline, you are probably seeing a toothed leaf margin.
Do not expect big teeth like a rose leaf, because moss teeth can be subtle and still diagnostic. You often see them as a slight sparkle along the rim when the leaf catches angled light.
Use the midrib as a reference line, because it helps you keep orientation while you scan the edge. Teeth that consistently lean toward the tip are more convincing than bumps that point in random directions.
If you can, inspect a leaf that is partly translucent when wet, because the edge becomes easier to separate from the background. On a dark lid, the teeth show as tiny triangular notches along the outline.
Rolled or recurved margins: how to see the edge turning under
Recurved margins mean the leaf edge turns backward or under, which can make a leaf look narrower than it really is. This trait is common in mosses that deal with drying winds on rooftops, curbs, and sunny masonry.
To see recurved margins, tilt the leaf so you are not looking straight down at the blade. When the edge rolls under, you often see a darker line on each side where the rim disappears.
Moisten the leaf and watch it open, because recurved margins can relax a little but often keep their rolled posture. If the leaf stays slightly boat-shaped with edges tucked, that is a strong sign.
Side lighting helps more than magnification here, so angle a small flashlight across the leaf. The rolled rim throws a tiny shadow that outlines the curl even when the surface looks smooth.
Be careful not to confuse recurved margins with a leaf that is simply folded from drying. A true recurved edge repeats on many leaves and tends to be symmetrical on both sides of the blade.
Border cells and thickened edges: noticing a pale rim without a microscope
Some mosses have a margin made of different cells, often longer, thicker-walled, or paler than the rest of the leaf. You can sometimes spot this as a light rim that tracks the edge like a thin outline.
This is one of those traits that feels invisible until you train your eyes, then you see it everywhere. A thickened moss leaf edge often looks slightly glossy or chalky compared with the greener center.
- Wet the leaf and blot it once to cut glare
- Use a dark background for contrast
- Tilt the leaf until the rim catches light
- Check the rim near the tip and mid-leaf
- Compare several leaves from the same shoot
- Photograph at 2x to 3x and zoom in afterward
When margins look toothed but aren’t: dirt, algae, and torn tissue
City mosses collect soot, mineral dust, and pollen, and that crud loves to stick right along the leaf edge. Under a lens, that line of debris can mimic a serrated outline and waste your time.
Algae films are another repeat offender, especially on constantly damp mortar. They can form tiny beads along the margin that look like teeth until you rinse the leaf and the beads slide off.
Torn tissue is common on path-edge patches where shoes and dog paws brush the colony. Tears create irregular gaps that do not repeat from leaf to leaf, and that inconsistency is your clue.
If you suspect dirt, swirl the leaf in a drop of water and tap it gently with tweezers. A real toothed leaf margin stays sharp and geometric after cleaning, while grime smears or disappears.
Watch for mineral crusts on concrete-grown mosses, because calcium deposits can form a jagged rim. If the “teeth” look bright white and chunky, you are seeing chemistry, not botany.
Margin behavior when wet vs. dry: using rehydration as a clue
Moss leaves change shape fast with moisture, and the margin can change how obvious a trait looks. If you only check a dry sample, you miss half the story and misread the moss leaf edge.
Dry leaves often curl, which can hide teeth and exaggerate recurved margins. Wet leaves spread, and that makes a serrate outline easier to trace with a lens.
Try a simple rehydration test in the field by misting and waiting, then checking the same leaf again. If the edge “smooths out” as the leaf opens, the earlier toothy look may have been tearing or folding.
Recurved margins usually stay recurved even after rehydration, though the leaf may look less tight. That persistence is why recurved margins are such a useful urban ID character.
Take two quick photos, one dry and one after wetting, because your memory will lie to you later. When you compare images side by side, moss identification by leaf margins becomes a repeatable habit instead of a hunch.
Comparing multiple leaves the right way (same position, same age)
One leaf can fool you, so you need a small sample of leaves that match in age and position. Margins vary across a shoot, and the difference between juvenile and mature leaves can be obvious.
Pick leaves from the middle third of several shoots in the same patch. Avoid the very outer leaves, which are often sunburned, and avoid the tiny new leaves near the tip.
Lay the leaves in a row on a lid and inspect the same region of each leaf, such as the upper third. If teeth appear in the same place across most leaves, you can trust the trait.
Keep your magnification and lighting consistent, because changing tools mid-check changes what you think you see. A 10x lens in shade gives a different impression than a phone zoom in full sun.
If the patch includes mixed species, which happens a lot on old brick, separate shoots by growth form before you pull leaves. A single tuft can hide a second moss with a different margin type and wreck your notes.
Pairing margin traits with growth form and habitat to avoid mis-ID
Margins are powerful, but you will still misidentify mosses if you ignore growth form and substrate. A smooth margin on a feather moss creeping in shade means something different than a smooth margin on a tight cushion in full sun.
Start with growth form, cushion, mat, tuft, or creeping spray, then add margin traits as your next filter. This keeps moss identification by leaf margins grounded in the whole plant, not a single feature.
Habitat narrows the candidate list fast in urban settings, because some mosses love alkaline concrete while others avoid it. If you see recurved margins on a curb-side colony that dries daily, that matches many drought-tolerant wall species.
Pay attention to microhabitats like sprinkler overspray, roof runoff lines, and the shady side of a planter. Those spots support softer leaves and can make a normally toothed margin look less obvious because the leaf tissue stays plump.
I also trust my nose for context, because moss on compost-rich soil smells different than moss on mortar dust. When you combine substrate, growth form, and the moss leaf edge, your IDs stop bouncing around week to week.
Quick notes system: how to record margin traits for repeatable IDs
If you do not write things down, you will keep re-learning the same margin lessons. A simple notes system makes your observations comparable across seasons and across different city blocks.
Use short codes, like ENT for entire, SER for serrate, and REC for recurved margins. Add a qualifier like “SER near tip” or “REC both sides” so the note has real value later.
Record moisture state, because dry vs wet changes how the edge reads. I write “dry tight, wet open” when a leaf shifts shape after misting, and that detail often explains earlier confusion.
Add a line for substrate and exposure, like “brick north wall” or “concrete curb full sun.” Urban mosses respond strongly to those conditions, so your margin notes make more sense with that context attached.
Attach one photo that shows the whole patch and one close-up that shows a single leaf edge. When you later compare similar patches, those images keep moss identification by leaf margins honest and consistent.
Conclusion
Leaf margins are a practical entry point for moss ID because you can see them with basic tools and a bit of patience. Once you can separate smooth margins, a toothed leaf margin, and recurved margins, many urban moss puzzles get smaller fast.
The best results come from cleaning the leaf, controlling glare, and checking several leaves from the same part of the shoot. Pair those margin observations with growth form and habitat notes, and your IDs will hold up when you revisit the site next month.
Keep your notes short, keep your photos consistent, and treat the moss leaf edge like a feature you can test rather than guess. That mindset is what turns casual looking into reliable moss identification by leaf margins.