Moss propagation in shallow dishes is the easiest way I know to keep a tiny culture on a desk without turning your workspace into a greenhouse project. You can run small batches, watch them daily, and change one variable at a time without wasting months.
A shallow container moss setup is basically a controlled puddle with boundaries, which sounds silly until you see how predictable it can be. When the container is only an inch or two deep, the surface dries and re-wets in a rhythm you can actually manage indoors.
The catch is that shallow dishes punish sloppy habits, especially with moss misting indoors and poor airflow. If you learn condensation management early, you avoid the two classic failures, sour substrate and drip damage that smashes new tips.
Why shallow dishes work: fast feedback and easy control
Shallow dishes work because you can see everything that matters at a glance, color, sheen, and whether the tips look plump or stressed. In a deeper pot, problems hide in the lower layers until the whole thing smells off.
Evaporation is faster in a dish, so you get feedback within a day instead of waiting a week to learn you overwatered. That speed makes it easier to dial in moss propagation in shallow dishes with repeatable routines.
You also get better control over contamination because the total surface area is small and easy to inspect. If algae starts, you can scrape it or replant quickly instead of fighting a whole tray.
A dish format encourages you to treat moss like a living surface, not a houseplant in a pot. You will notice how different species respond to the same light and humidity, and that is where you start building real skill.
For desk culture, shallow containers keep weight low and spills less dramatic, especially if you choose a dish with a flat base. I keep one on a cork mat, and even a bumped elbow rarely turns into a cleanup.

Selecting dishes and lids: glass, plastic, and ventilation options
Start with something you can clean hard, because films build up fast when you do moss misting indoors. Glass food storage, small terrarium bowls, and clear deli containers all work, but they behave differently.
Glass stays clearer and resists scratches, which matters when you want to judge moisture by surface shine. The downside is that glass swings temperature a bit faster near a window, so you may see more condensation spikes.
Plastic is forgiving and cheap, and I like it for experiments where I might drill holes or cut vents. It scratches easily though, and scratches hold algae, so you need a dedicated sponge and occasional vinegar rinses.
Lids are optional, but they make shallow container moss much easier in dry offices with forced air. A loose lid that can slide a few millimeters is better than a tight seal, because you want humidity without stale air.
If you do add ventilation holes, keep them small and few at first, like two to four pinholes in a deli lid. You can always add more, but you cannot un-drill a lid that dries the dish out by lunchtime.
Building a thin substrate layer that won’t sour
A thin substrate is where shallow dishes shine, because you can keep it just deep enough to hold moisture without turning anaerobic. For moss propagation in shallow dishes, I aim for about a quarter inch to a half inch of material, depending on species.
The goal is stable moisture with oxygen, so avoid dense garden soil and avoid piling it up. If your dish smells swampy when you open the lid, the substrate is sour and you need to reset.
| Substrate mix | Best use in shallow dishes | Failure risk to watch |
|---|---|---|
| Sphagnum peat plus rinsed sand (2:1) | Fast regrowth for many common sheet mosses | Compaction if packed, leads to sour pockets |
| Coconut coir plus sand (2:1) | Beginner friendly, less acidic than peat | Salts if not rinsed well, tip burn |
| Long fiber sphagnum chopped thin | Moisture buffer for small fragments | Algae if kept too wet under strong light |
| Akadama or fine pumice with a pinch of peat | Clean surface, good airflow around rhizoids | Dries fast, needs tighter lid control |
| Bare rock tile with a smear of clay dust | Slow, tidy cultures for cushion mosses | Dry edges, needs consistent misting |
Choosing moss for small containers: texture and growth speed
Some mosses behave like weeds in a dish, and others sulk for months, so pick species that match your patience. For small containers, I like mosses that creep and knit, because they cover bare spots without constant replanting.
Sheet forming mosses with branching stems usually respond well to moss propagation in shallow dishes, especially when you keep humidity steady. Cushion mosses can work too, but they often want brighter light and cleaner surfaces.
Texture matters on a desk because you will look at this thing up close, and coarse textures show drip damage more clearly. Fine textures can look amazing in a shallow container moss setup, but they also trap debris and algae threads.
If you collect locally, take tiny amounts from already disturbed spots like sidewalk cracks or old retaining walls. Avoid moss from chemically treated lawns, because residues can show up as browning tips in a closed dish.
I skip species that demand constant flowing water or heavy sun, because they turn into a daily chore indoors. Desk culture works best when you can miss a day and the moss still looks normal.
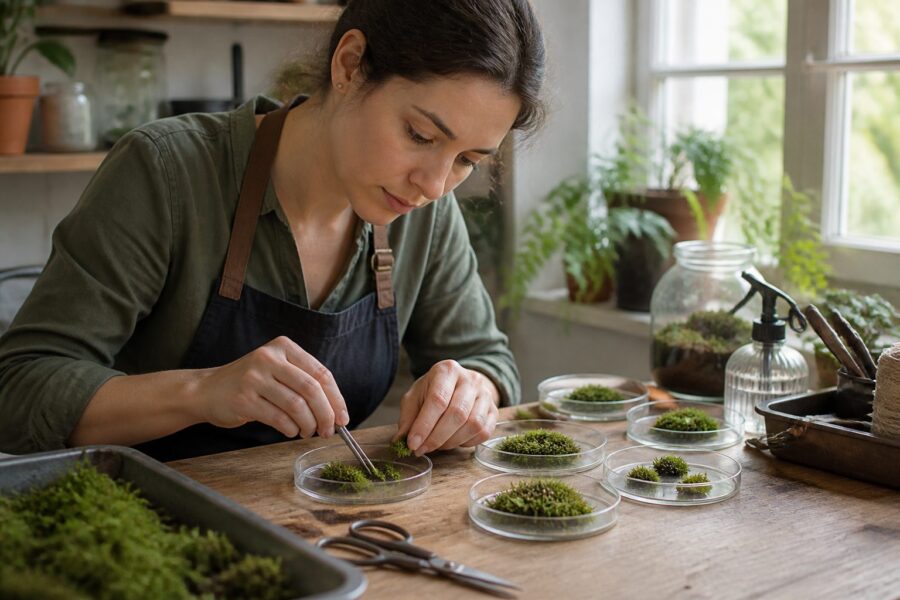
Planting methods: press-in patches vs scattered fragments
Press-in patches are the cleanest way to start, because the moss stays oriented and the stems keep contact with the substrate. If you can lift a thin mat with rhizoids attached, you will see faster anchoring in moss propagation in shallow dishes.
Scattered fragments are better when you only have crumbs, or when you want the dish to fill in evenly over time. The trick is to make fragments small enough to branch, but not so pulverized that they rot before they attach.
I press patches down with a clean spoon, then mist lightly so the surface settles without floating. If the patch slides when you tilt the dish, you need either less water or a slightly rougher substrate top.
For fragments, I spread them like seasoning, then tap them into the damp substrate with fingertips or tweezers. A thin top dressing of sand can help pin them, but too much sand buries tips and slows growth.
Label your dishes, because two cultures can look identical for weeks and then diverge fast. I write date, light hours, and whether I used patches or fragments, and that little note saves real time later.
Managing condensation: how to prevent drip damage
Condensation management is the difference between a tidy green carpet and a dish full of crater marks. When droplets form on the lid and fall, they hit with enough force to flatten new growth, especially on fine sheet moss.
You can reduce dripping by keeping the lid slightly ajar and by avoiding big temperature swings near windows or laptop exhaust. If you see heavy fogging every morning, your dish is too sealed or too warm at night.
I wipe lids with a clean paper towel when droplets start collecting into beads, because that is when they fall. Some people tilt the lid, but on a desk that usually turns into water running down one side and pooling.
A simple trick is to set the dish on a thin cork coaster, which buffers temperature changes from a cold desktop. Less temperature swing means less condensation, and that directly reduces drip damage.
If you want a more hands-off approach, add one or two pinholes and accept slightly more frequent misting. That trade is worth it for shallow container moss cultures that keep getting battered by lid drips.
- Crack the lid 1 to 3 mm for airflow
- Move the dish away from window glass at night
- Wipe lid beads before they merge into drops
- Use a coaster to reduce cold desk contact
- Avoid placing the dish above a warm router or laptop vent
- Add two pinholes if fogging is constant
Light placement on a desk or shelf: distance and duration
Light is where most desk growers overdo it, because moss looks tough outdoors and people assume it wants sun. Indoors, a small dish under a bright LED can cook at the surface while the air still feels cool.
I prefer a modest desk lamp with a daylight LED bulb, placed far enough away that the lid does not warm up. If you can hold your hand at dish height for a minute and it feels warm, back the light off.
Duration matters as much as distance, and long photoperiods can push algae faster than moss. For moss propagation in shallow dishes, I start around 10 to 12 hours and adjust based on color and growth.
On a shelf, under-cabinet LEDs work well because they spread light evenly across the dish. Uneven lighting causes one side to thicken while the shaded side stays stringy and damp.
Watch the tips, not the overall green, because stressed tips go pale or bronze before the whole patch changes. If tips fade while moisture looks fine, lower intensity or shorten the day before you change anything else.
Watering routine: misting frequency and when to pause
Moss misting indoors is not about keeping the dish wet all the time, it is about keeping the surface from going bone dry. In shallow container moss cultures, the surface can dry while the bottom stays damp, so you need to read the sheen.
I mist with a fine sprayer until the surface darkens evenly, then I stop before puddles form. If water pools, fragments float and you will get bare spots where you wanted a smooth fill.
Frequency depends on your lid setup, office humidity, and light, so ignore fixed schedules at first. Many desk setups land at a light mist every one to three days, with longer gaps when the lid stays mostly closed.
Pause misting when you see constant fogging and the moss looks glossy all day, because that is a sign the dish is not breathing. That pause feels scary the first time, but it often stops algae and helps stems attach.
Use low mineral water if you can, because mineral crust builds fast in tiny containers. Distilled or reverse osmosis water keeps the dish cleaner, and it makes condensation management easier because you get fewer deposits on the lid.
Keeping the surface clean: removing debris and algae early
Desk dishes collect lint, paper dust, and stray hair, and that junk turns into rot spots. I keep a pair of tweezers nearby and pull debris the moment I see it, because waiting a week makes it merge into the mat.
Algae usually shows up as a slick green film on bare substrate, especially under long light hours. If you catch it early, you can scrape a thin layer off with a spoon and replace it with fresh sand or pumice.
If algae keeps returning, the fix is usually less water and a touch more airflow, not stronger light. Too much light on a wet surface is an algae invitation in moss propagation in shallow dishes.
Mold can show up on dead fragments, and it spreads faster in sealed dishes. I remove the affected bits, wipe the lid, and leave the lid cracked for a day to reset the air.
Do not fertilize a desk dish unless you enjoy algae, because nutrients in a tiny volume get out of control fast. Moss can grow slowly on low nutrient substrates, and slow is fine when you want a stable culture.
Expanding your dish culture: splitting and re-planting
Once the dish knits together, you can expand by splitting like you would split a lawn sod, just smaller and gentler. I use a clean razor or spatula to lift a strip, then I press it into a new shallow container moss dish.
Split when the moss has obvious new growth at the edges, because that is the part that recovers fastest after handling. If you split too early, the pieces stall and you end up babysitting them with extra misting.
Replanting is also a chance to correct problems, like moving away from a substrate that compacted or grew algae. I often move the cleanest top layer to a fresh dish and discard the bottom layer that started to sour.
Keep one dish as a backup and keep it boring, with moderate light and conservative watering. When an experimental dish crashes from bad condensation management or overzealous misting, that backup saves the whole project.
If you want to trade or share, ship small patches on damp paper, not submerged in water. A patch that arrives slightly damp usually recovers, while a patch that arrives waterlogged often turns brown in a day.
Conclusion
Moss propagation in shallow dishes works because it keeps the system small enough that your choices show up fast, for better or worse. If you control light, keep the substrate thin, and stay on top of condensation management, the dish stays stable for months.
A shallow container moss culture does not need fancy gear, but it does demand attention to small signals like lid fogging, surface sheen, and tip color. When you get those signals right, moss misting indoors becomes a simple habit instead of a constant rescue mission.
The best part is how easy it is to scale, because one healthy dish can seed several more with clean splits or fragments. Keep notes, stay willing to reset a sour dish, and your desk can support a surprisingly solid little moss collection.

